Canon EOS 80D review
-
-
Written by Gordon Laing
In depth
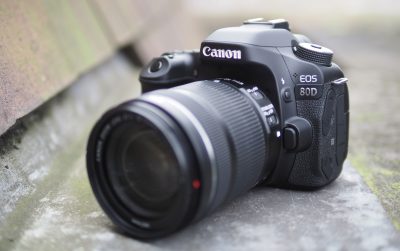
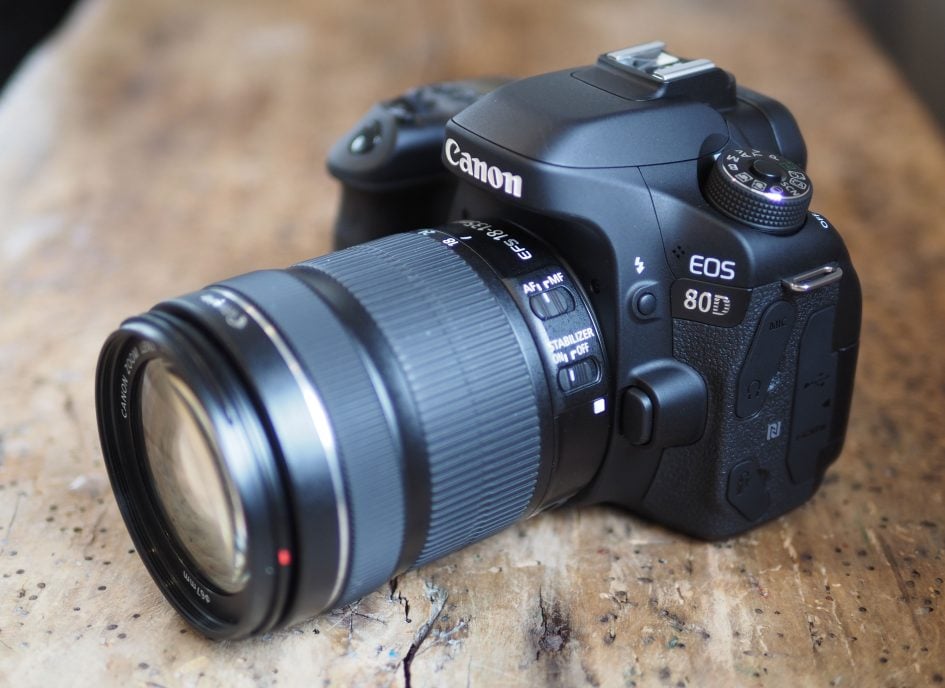
Canon’s EOS 80D is a mid-range DSLR featuring a 24 Megapixel APS-C sized sensor, 45-point AF system, 7fps continuous shooting and Full HD video up to 1080 / 60p. Announced in February 2016, it comes almost three years after the 70D which itself came three years after the 60D. Like those bodies, it sits in the middle of Canon’s DSLR range, offering a step-up in speed, build, control and features over the triple-digit EOS / Rebel DSLRs, but without the cost and heft of semi-pro bodies like the 7D series.
The earlier 20.2 Megapixel sensor of the EOS 70D has been upgraded to a new 24 Megapixel sensor on the 80D and like its predecessor it employs Canon’s Dual Pixel CMOS AF technology. This allows 80% of the pixels on the sensor to double-up as phase-detect AF points, supporting smooth and confident continuous AF during live view and movies. In a nice upgrade over the 70D, Dual Pixel CMOS AF now works with all lenses (not just the recent ones), and is additionally supported at the top movie frame rate of 1080 / 60p. You can now adjust the speed and response, and there’s also a headphone jack, although still sadly no 4k options.
The earlier 19-point AF system has been upgraded to a 45-point system, all of which are cross-type sensors; 27 of them work at f8 and the entire array is sensitive to -3EV. Wrapping-up the specs, the EOS 80D inherits the fully-articulated touchscreen, built-in Wifi (now with NFC) and 7fps continuous shooting of its predecessor. Announced alongside the EOS 80D is a new EF-S 18-135mm zoom with a Nano-USM motor which promises the smoothness of STM for movies and the speed of USM for shooting stills at 7fps with CAF. A new PZ-E1 accessory clips underneath the lens barrel to provide dual-speed motorised zooming capabilities which can also be operated remotely via the phone app.
Canon EOS 80D video review
In the first video below you’ll see an interview between myself and Doug Kaye where we discuss the EOS 80D in-depth and how it compares against key rivals. Below this is a shorter brief demonstration of the EOS 80D, describing its headline features and showing the new PZ-E1 motorised zoom lens adapter in action.
Canon EOS 80D design and controls
Viewed from the front, the EOS 80D greatly resembles its predecessor, the EOS 70D, and you’d really need to place the new and old models side-by-side to spot the very subtle styling differences.. Measuring 139x105x79mm, it’s essentially the same size, and at 730g including battery, only a few grams lighter.
The 80D is smaller and lighter than the EOS 7D Mark II (at 148x112x78mm and 910g with battery) which occupies a ‘higher-end’ position in the current line-up, although discounts mean there may not be much between them price-wise; I’ll make a number of comparisons in this review for those who are weighing-up both models. Meanwhile Nikon’s D7200, which is aimed at a similar buyer to the 80D, is roughly the same weight at 765g including battery, but slightly narrower and thinner, and a little taller at 136x107x76mm.
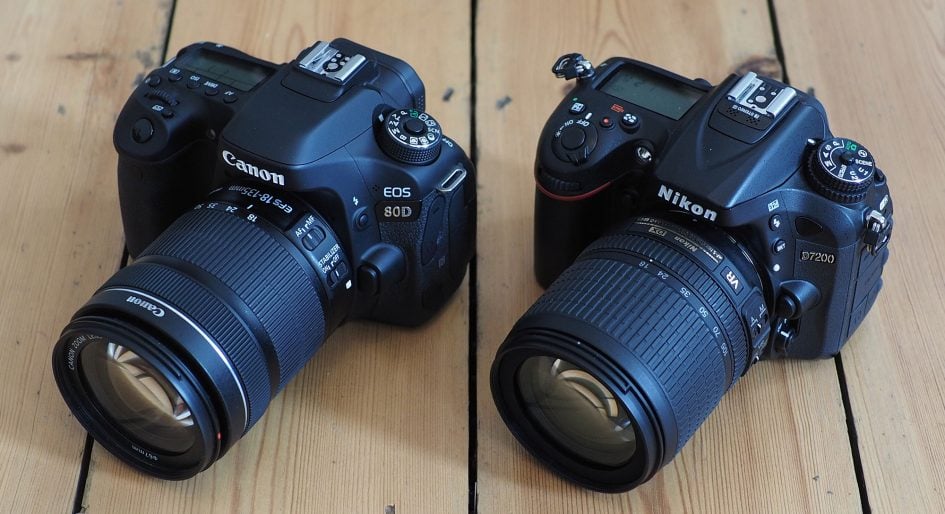
All these DSLRs are much heftier than a typical mirrorless camera: even the high-end Olympus OMD EM1 and Fujifilm XT1 are noticeably smaller and lighter, with bodies measuring 130x94x63mm and 129x90x47mm, and weighing 496g and 440g with their batteries respectively.
In terms of build quality, the EOS 80D shares a similar construction to the EOS 70D with a polycarbonate resin and glass fiber covered metal shell. In this respect it remains below the toughness of the EOS 7D II, not to mention the much earlier EOS 50D, with their full magnesium alloy shells. Interestingly Nikon has gone for a halfway approach with the D7200 and the D7100 before it, by employing magnesium alloy on selected parts of the body, satisfying the desires of many enthusiasts without the cost and weight of a full magnesium alloy body such as the D500 or EOS 7D II.
Canon describes the EOS 80D as offering water and dust resistance, but doesn’t say to what degree. Meanwhile Nikon describes the D7200 as having full weather-sealing, again being a little ambigious about what sort of conditions you could or couldn’t use it in safely. As always you’d need to couple either with a weather-sealed lens (ie none of the current EF-S or DX kit zooms) to enjoy any protection at the mount, although I should note I didn’t experience any issues with either body when using their kit zooms.
In your hands the 80D, like its predecessor, feels satisfyingly chunky. There’s plenty to wrap your fingers around on the grip, and on the rear is a substantial ridge for your thumb to press against. The D7200 is also a lovely camera to hold, benefitting from Nikon’s hooked inner area inside the grip for your fingertips, although the thumb rest on the rear isn’t as pronounced as on the Canon. It’s all down to personal preferences, but I felt the coarser rubber texture on the 80D was stickier than the smoother pattern on the surfaces of the D7200. Just like their predecessors.
In terms of composition, the EOS 80D offers a traditional optical viewfinder or a fully-articulated touchscreen. Starting with the optical viewfinder, the 80D is equipped with Pentaprism head delivering a 100% view with 0.95x magnification. The magnification is the same as the earlier 70D, but Canon has slightly increased the coverage from 98% to 100%, allowing it to match the Nikon D7200 (and D7100) in this regard. Interestingly both Nikon bodies quote a fractionally lower magnification of 0.94x, but compare them side-by-side with the Canon and you’ll notice the Nikon viewfinder image is actually fractionally bigger. You’re not going mad, this is down to the fractionally larger sensor employed by Nikon (with a 1.5x field reduction compared to 1.6x by Canon). In use though they’re essentially delivering the same sized viewfinder image and both also offer a number of LCD icons and guides shown below.
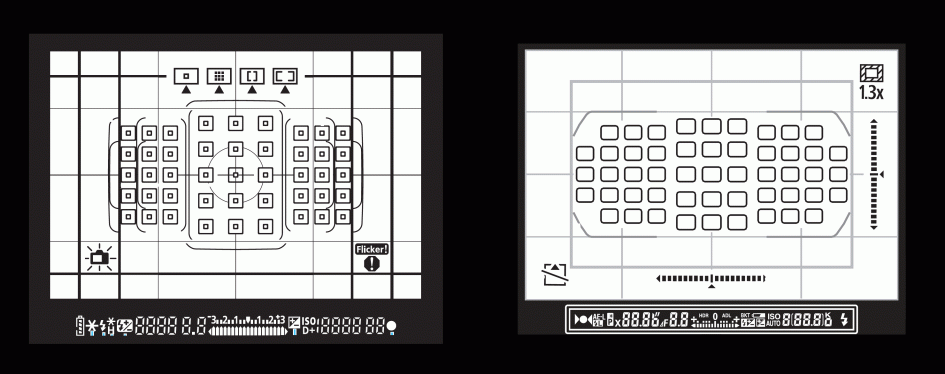
Above left: Canon EOS 80D viewfinder, above right: Nikon D7200 viewfinder
Both cameras can indicate their active AF area, along with offering optional on-demand grid lines to aid alignment. You’ll also notice thicker black lines in the Canon viewfinder which are activated when you’re shooting in the 4:3, 16:9 or 1:1 aspect ratios. The Nikon doesn’t offer different aspect ratios when shooting photos, but does offer a 1.3x overall crop, which is indicated by a narrower frame in the viewfinder.
A simple icon in the lower left of Canon viewfinder can indicate if the camera is level or tilted to one side or the other, but not by how much, while four additional icons in the upper middle can optionally indicate the AF area mode. You can also enable a flicker warning, alongside a general warning icon which appears when you’re shooting in the Monochrome style or in HDR mode. Note Nikon’s D7200 viewfinder doesn’t have a monochrome warning, but it does offer twin scales as a more sophisticated leveling gauge, albeit only appearing when you configure one of its function keys correctly.
The viewfinders on the 80D and D7200 reflect their relative positions in their ranges. The lower-end models generally employ penta-mirror viewfinders for size, weight and price, but deliver a smaller image as a result. Meanwhile the higher-end EOS 7D Mark II and D500 boast larger penta-prism viewfinders with 1x magnifications for a bigger image than either the 80D or D7200. But it would be remiss of me not to look beyond DSLR technology and mention electronic viewfinders which on a camera of this class would offer a significantly larger viewfinder image for a much more immersive experience. Electronic viewfinders also don’t need to warn you that the camera is shooting in, say, black and white, as they’ll simply preview the effect as you compose; they also offer manual focus assistance, can be used to shoot movies and also playback images and videos. Conversely an EVF will become noisier and or slower in very low light, lags when panning to shoot bursts of action and consumes more power, but I always like to point out there’s pros and cons to both technologies.
Like the EOS 70D, the 80D is also equipped with a 3in screen with 1040k dot (720×480 colour pixels) resolution and a 3:2 aspect ratio which means images composed in Live View or played back will fill the screen. Meanwhile Nikon’s D7200 offers a slightly larger 3.2in screen with 1229k dots (640×480 colour pixels), but in the squarer 4:3 aspect ratio which means images are composed in Live View or played back with a thin black strip underneath. This crop effectively means the active image area on the D7200 is roughly similar to that on the EOS 80D.
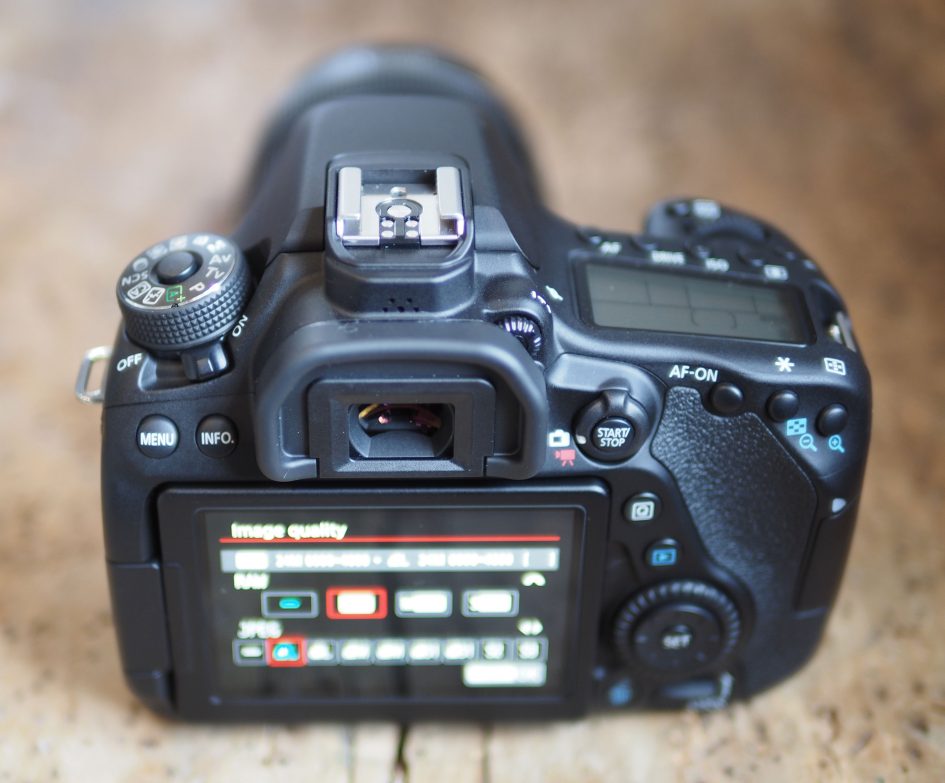
Pressing the info button outside of Live View cycles between a page of settings information, a single axis leveling gauge (c’mon can’t we have a dual axis on every model?) and the main shooting information screen, which can be adjusted using the Q Menu interface.
But the EOS 80D’s screen has two major benefits over the D7200. First, like the EOS 70D before it, the screen is fully articulated, allowing it to flip out and twist to any angle including forwards towards the subject which is great for selfies or filming pieces to camera; indeed, coupled with the superb movie AF, it makes the EOS 80D one of the best options for vloggers. The articulation gives it much greater compositional flexibility than the D7200.
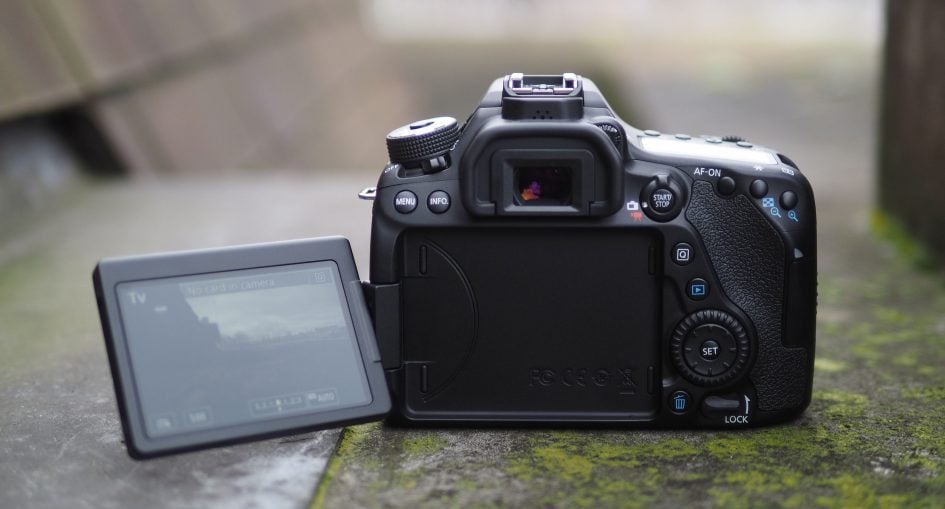
The second benefit over the D7200 is the EOS 80D’s screen is also touch-sensitive. Like its predecessor, you can tap through the menus, quickly enter copyright or network information, swipe and pinch images in playback, scroll through shooting information and histograms when reviewing photos, and best of all, tap to refocus anywhere on the screen when shooting stills in live view or filming video. Even if you’re not bothered about using the touch capabilities to navigate the menus, the ability to tap to focus is useful to all shooters and a significant benefit over the Nikon D7200, not to mention the EOS 7D Mark II.
In terms of controls, the EOS 80D will be familiar to anyone who’s used a Canon DSLR. The layout is inherited from the earlier 70D, although Canon’s tweaked the shape of some of the buttons and collars.
As before, the mode dial is on the upper left side of the body, surrounded by a satisfyingly chunky power switch. The mode dial has a button in the middle which needs to be held down before it can be turned, preventing any accidental changes. I’ll cover the modes themselves in more detail later, but for now note the 80D features more options than its predecessor.
On the upper right side is an LCD information screen which superficially looks the same as the 70D displaying the shutter, aperture, ISO, focus, drive and metering modes, battery life, Wifi status, and the shots remaining, but again Canon’s made a few minor tweaks. So the icon indicating HDR mode has gone and there’s now icons to show when the multiple exposure or timelapse movie modes are enabled.
Along the front side of the display are four buttons to adjust the AF mode, Drive mode, ISO value and metering mode, while a fifth button illuminates the display with an orange light. Note the Nikon D7200 employs a physical dial to set the drive mode around the main mode dial.
Like the 70D you’ll find a dedicated AF area selection mode button sandwiched between the front finger dial and shutter release button. This allows you to choose between auto area, single area or Zone AF modes – see the focusing section below for more details.
Round the back are the usual three buttons in the upper right corner: AF ON, AE lock and manual selection of the single AF point, and as before the last two double-up as zoom-out and zoom-in controls when viewing images in playback or composing in Live View.
To the lower right of the screen is the same thumb wheel as found on the 70D and 6D which features an eight-way rocker in the middle and a small SET button inside of that. As I mentioned in my earlier 70D review, I much prefer the chunkier thumb wheels on Canon’s higher-end bodies and while the 80D’s control is larger than, say, the 760D / T6s, I’d still sooner it was more like the 7D Mark II.
Following other recent Canon DSLRs, the 80D employs a simple control for entering Live View and the movie mode. This consists of a Start / Stop button surrounded by a collar which switches between Live View or Movies. This works really well, although 70D owners will note Canon has rotated the position of the collar switch.
On the grip side of the EOS 80D you’ll find a single SD memory card slot. I’m not surprised Canon’s resisted equipping the 80D with twin memory card slots, but it does mean Nikon continues to enjoy this advantage over its rival. Twin card slots on the D7200 – and indeed the D7100 before it – allow you to automatically backup images onto two cards, record RAW to one and JPEG to the other, or simply keep shooting when one fills up. It’s also a differentiation between the 80D and the higher-end 7D Mark II.
The EOS 80D includes a popup flash with a Guide number of 12m at 100 ISO (matching the Nikon D7200), and a hotshoe for external flashguns. Like most mid-range cameras, there’s no PC sync port for external lighting on either the 80D or D7200. For a PC Sync port you’ll need to move up to the Canon EOS 7D Mark II or Nikon D500.
In terms of connectivity, the EOS 80D is equipped with USB and Mini HDMI ports, along with a pair of 3.5mm jacks to connect external stereo microphones and headphones, the latter a useful addition to bring it in line with the D7100 and its successor the D7200. There’s also a port that’s compatible with the RS-60E3, TC-80N3 and RC-6 remote controls.
In terms of wireless, the 80D is equipped with Wifi and NFC which I’ll cover in detail later in the review, although I’ll mention right now that I couldn’t get the Camera Connect app to provide GPS location logging or tagging, despite it being possible for Canon’s compacts; I think this is a deliberate limitation for EOS DSLRs and if you want your position embedded in your photos, you’ll either need to use a third-party logging and tagging app or splash out on Canon’s dedicated GP-E2 accessory. The D7200 is in a similar situation as while its smartphone app does offer some degree of location tagging, it can only take place on images transferred to your phone at the place of capture. Interestingly Canon’s EOS 7D Mark II takes an opposite approach with no Wifi, but a built-in GPS receiver in the head. Is it too much to ask for Wifi on all the models and smartphone apps with decent location tagging options? It’s something available across most mirrorless cameras, not to mention Canon’s own PowerShot compacts.
In terms of power, the EOS 80D employs an LP-E6N Lithium Ion battery pack, rated at 1865mAh and quoted at delivering around 960 shots using the viewfinder (23 degrees Celsius), which is noticeably more than the 670 shots quoted for the EOS 7D Mark II with the exact same battery. Meanwhile Nikon ambitiously quotes up to 1110 shots from a single charge of its EN-EL15 (1900mAh) pack. Switch any of them into Live View, start shooting movies or exploiting wireless connectivity though and you’ll see the battery life fall considerably.
If you’d like longer life from the 80D you can fit the optional GB-E14 battery grip, which coincidentally is the same model which fits the 70D; like most grips, this can take two battery packs and provides portrait controls. Like most DSLRs, the 80D charges its batteries using a separate AC-powered charger, supplied with the camera. There’s no USB charging here yet.
Canon EOS 80D lenses
As an EOS DSLR, the 80D features a standard EF lens mount with native compatibility with the entire Canon EF lens catalogue, including EF-S models designed for the smaller APS-C sensor. This is the key benefit of the EOS 80D over rival formats, especially youthful mirrorless ones: native access to over 80 lenses from the enormous Canon catalogue without the need for an adapter or compromised AF performance.
With an APS-C sensor, the effective field of view of all lenses is reduced by 1.6 times, so the 18-55mm and 18-135mm kit zooms would deliver a field of view equivalent to 29-88mm and 29-216mm on a full-frame DSLR. I tested the EOS 80D using the EF-S 18-135mm STM lens which features smooth and virtually silent focusing in Live View and movies; if you intend to shoot a lot of video with the 80D, it’s well worth going for Canon’s STM lenses. Here’s an example of the coverage at both ends of the focal range.

Above: Canon EF-S 18-135mm STM coverage, 29mm equiv (left), 216mm equiv (right)
Canon launched a new zoom lens alongside the EOS 80D: the EF-S 18-135mm f3.5-5.6 IS USM. If this sounds familiar in focal length and aperture, you’d not be wrong, as it shares the same specification – and what appears to be the same optical construction – as the existing EF-S 18-135mm f3.5-5.6 IS STM that I used for my tests. The difference for those who’ve not been paying attention to the acronyms is USM vs STM, but there’s more to this than first appears, not to mention the debut of an additional brand new feature.
The new EF-S 18-135mm f3.5-5.6 IS USM employs a brand new Nano-USM autofocus system which Canon reckons is as smooth and quiet as their STM models for refocusing during movies, but as fast as their traditional USM lenses when it comes to continuous AF in burst shooting; this is important when used with bodies like the EOS 80D which can shoot bursts at 7fps. Indeed Canon reckons the new lens is up to two and a half times faster at focusing than the old model at wide-angle and over four times faster for telephoto.
In addition, the EF-S 18-135mm f3.5-5.6 IS USM becomes the first Canon lens to feature electrical contracts and a gear interface for use with the new PZ-E1 Power Zoom adapter. This optional accessory clips beneath the lens barrel and uses a Micro USM motor powered by four AAA batteries to adjust the zoom smoothly at a choice of two speeds using a rocker control; in my brief time with the new lens at a Canon event, I estimated the fast speed took about three seconds to go from 18 to 135mm, while the slow speed took roughly ten seconds. Here’s a video of it in practice.
Motorised zooms are ideal for movies, but are rarely available for cameras with larger sensors and removeable lenses – indeed if we’re talking about cameras with APS-C sensors, I can only think of Sony offering motorized zooms. Now the EF-S 18-135mm f3.5-5.6 IS USM and PZ-E1 bring motorized zooming to any Canon body, although mount it on the new EOS 80D and you’ll additionally be able to operate the zoom by remote control using the Camera Camera Connect app on an iOS or Android device, or via the EOS Utility on a Mac or PC – just like using one of the company’s point-and-shoot cameras.
Unfortunately beyond a brief try at a Canon event I haven’t had any other experience with the new lens or adapter, as Canon supplied my 80D sample with the older version of the lens. The big questions of course are whether there are more lenses planned for use with the adapter (or indeed other adapters), and whether other bodies apart from the 80D will support the ability to operate the zoom by remote control. I asked Canon, but sadly it’s not known yet, but if I discover anything further I’ll update this page.
Finally for the lens, Canon describes the IS unit as being improved, although the specifications for the old and new model still claim the same four stops of compensation.
Canon EOS 80D shooting modes
The EOS 80D’s satisfyingly chunky mode dial offers the choice of PASM, Bulb, Green Square Auto, Flash Off, Creative Auto, Scene, Creative Filters and two Custom banks; compare this to the simpler EOS 70D dial which lacked a position for Creative Filters and only had one Custom bank. I’ll cover each mode in this section.
The shutter speeds range from 30 seconds to 1/8000 and there’s a 1/250 flash sync speed. In these respects it’s the same as the EOS 7D Mark II, EOS 70D and Nikon D7200, although it’s worth noting the full-frame EOS 6D only offers a maximum shutter speed of 1/4000 and a fastest flash sync of 1/180.
Like other recent Canon DSLRs, the motorised shutter makes a distinctive and audible ‘ker-clack’ sound. There’s a ‘silent’ drive mode which, like most DSLRs, seems to just slow down the shutter and mirror recocking sound to a ‘tick-er-tick’ sound that’s about half as loud as the normal shutter, but still quite audible. Similarly for the silent continuous drive mode which sounds almost like a horse cantering along.
In Live View, there’s three ‘silent’ options: Mode 1 (the default), Mode 2 and Disabled. Mode 1 and Mode 2 both use what sound like the physical shutter, slowed down to be quieter but again still audible. Mode 2 differs from mode 1 by delaying the second half of the action as you hold the shutter button down until you let go of it. Meanwhile if you choose Disable, the camera sounds like it closes the shutter and flips the mirror before opening the shutter again. Either way, it’s a three-step process.
While the ‘silent’ modes are a little quieter than the normal drive modes, they’re still far from silent. This may be typical for a DSLR, but in contrast, mirrorless cameras are much quieter. For starts there’s no mirror to flip up and down and even their mechanical shutters generally sound quieter. But crucially most mirrorless cameras now also offer electronic shutter options which may be susceptible to rolling shutter / skewing artefacts, but operate in genuine silence. These are invaluable when shooting mostly still subjects discretely be it for street photography or during ceremonies. The ability to shoot in silence is a significant benefit has mirrorless has over DSLR and I’m not sure why their Live View modes don’t offer the option; maybe their data readout is too slow.
In happier news, the EOS 80D now offers the Anti Flicker option of the higher-end bodies. When enabled, this detects the pulsing frequency of certain types of artificial lighting and fractionally delays the shutter if necessary to avoid the dark part of the cycle. This also works when shooting bursts, although in either case you may inevitably find the camera less responsive at times. That said, you may be willing to accept a little lag or slower continuous shooting in return for avoiding dark frames under fluorescent lighting.
Moving on, if, like me, you’re into long exposure photography, you’ll appreciate the Bulb timer feature on the EOS 80D. This allows you to preset a maximum exposure time (in hours, minutes and seconds) when shooting in Bulb, after which the camera will automatically close the shutter – combine this with a self-timer and you can capture hands-free long exposures without any accessories. As with some other Canon cameras, if the ISO is set to Auto in Bulb mode, it’ll set itself to 400 ISO. Here’s two long exposures I took with the EOS 80D using the Bulb timer and with long exposure noise reduction disabled.
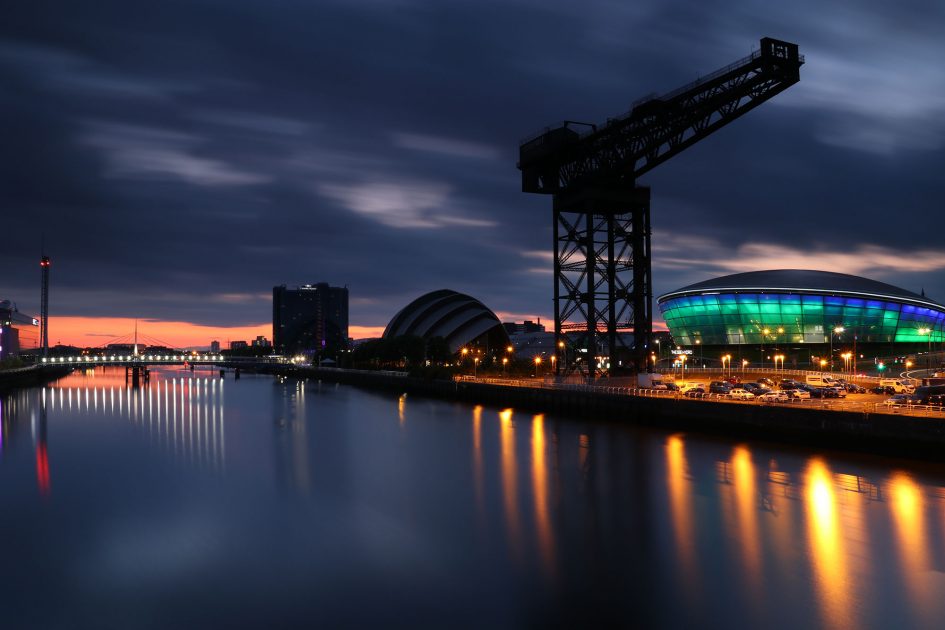
Above: Canon EOS 80D Bulb Timer: 120 seconds
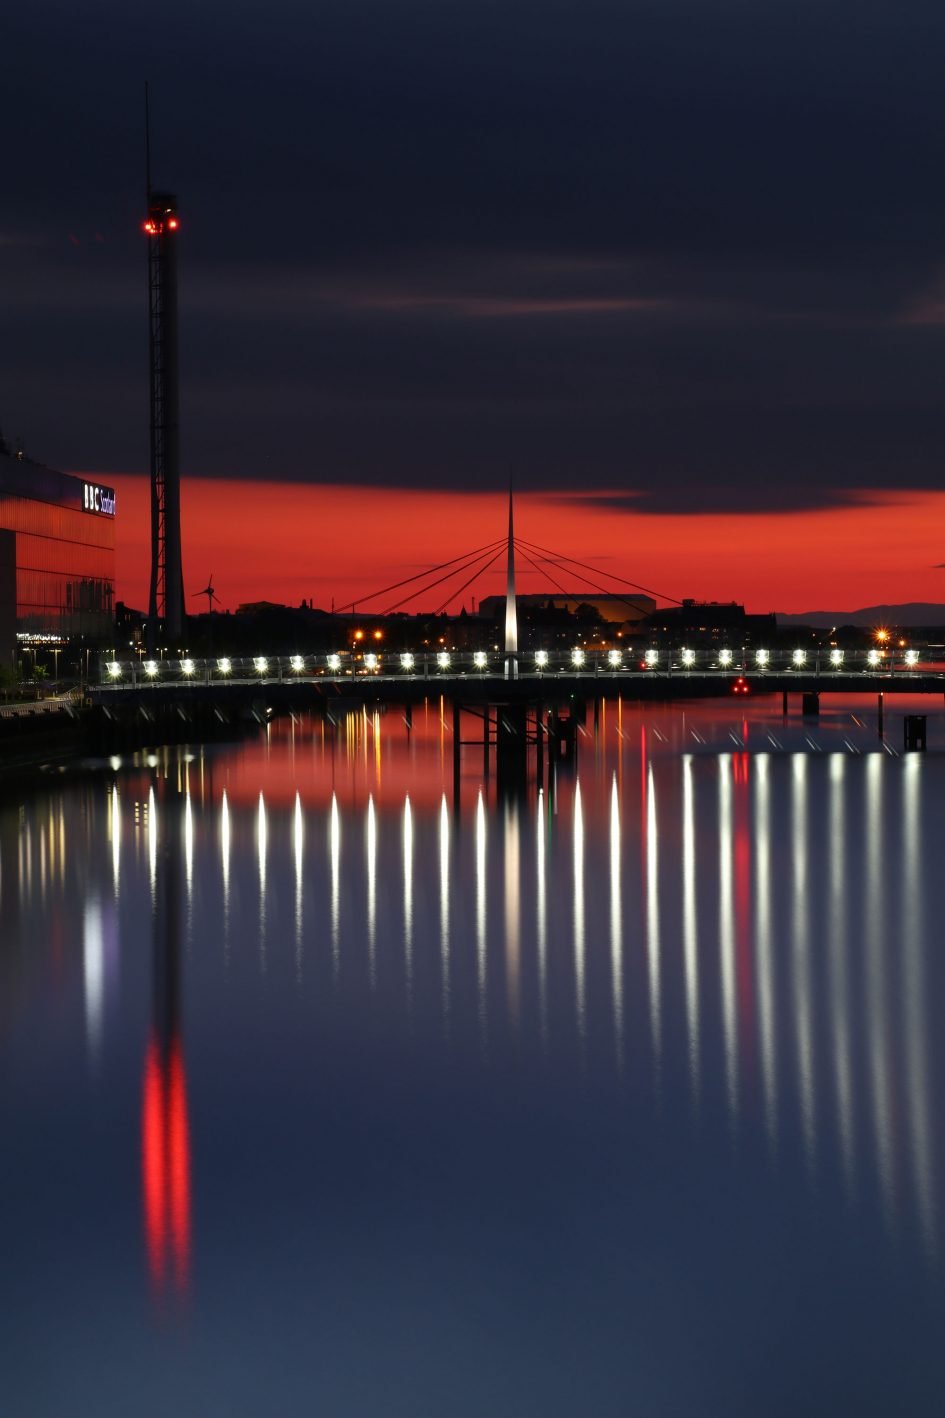
Above: Canon EOS 80D Bulb Timer: 180 seconds
Metering through the optical viewfinder is carried-out by a 7560 pixel RGB+IR sensor divided in 63 segments in a 9×7 array. As before you can choose between four metering modes: Evaluative (which considers the whole array), Partial (approximately 6% of the viewfinder), Spot (approximately 3.8% of the viewfinder) or Centre-Weighted. I used Evaluative for most of my test shots and found the EOS 80D did a good job at metering the scene as desired.
In terms of auto exposure bracketing, the EOS 80D offers the same 2, 3, 5 or 7 frame options as its predecessor at up to 3EV apart. Interestingly in the previous generation, this was enough to beat the five-frame bracketing of the earlier D7100 but with the latest D7200 Nikon has leap-frogged its rival with up to nine-frame AEB. To be honest though, seven frames is arguably enough for even the most extreme situations and it’s great to see Canon offering it when not that long ago three-frame AEB was the norm.
A Multiple Exposure mode lets you combine between two and nine shots using Additive or Average techniques; if you shoot in Live View you can see the effect build-up, or you can simply press play to see the result so far and stop if necessary.
Fans of HDR photography are well-catered on the 80D: along with seven-frame AEB and presets in the Scene and Creative Filter modes, there’s a dedicated HDR option in the main menus. The latter takes three photos and automatically combines them into one; this only works in JPEG mode and the camera won’t save the separate images, only the final composite. In terms of exposure you can choose +/- 1, 2 or 3EV, or let the camera work out what’s best for you. There’s an option to auto align if you’re not shooting on a tripod, and best of all another the option to capture the three frames with a single press of the shutter release; this is useful because you can trigger the burst using the self-timer, thereby ensuring the camera isn’t touched between frames and preventing the need for a cable release accessory.
Here’s an example I took where there’s a significant difference in brightness between the castle ruins in the foreground and the overcast sky behind it. On the left is the original single frame exposure and on the right the HDR version with a +/-3EV range and the default Natural processing.Note how the HDR version employs a mild crop while auto-aligning the images.


Above: Canon EOS 80D HDR disabled (left), enabled with 3EV range and Natural effect (right)
The EOS 80D also offers a selection of HDR tone mapping effects. In addition to Natural, you can choose Art Standard, Art Vivid, Art Bold and Art Embossed, although I personally find the end-result more than a little over-cooked.

Above: HDR Art Standard (left), HDR Art Vivid (right)

Above: HDR Art Bold (left), HDR Art Embossed (right)
If you really want to muck about, you can combine the HDR modes with alternative Picture Styles, such as Monochrome, although again the results may not be to your taste. They’re certainly not to mine.
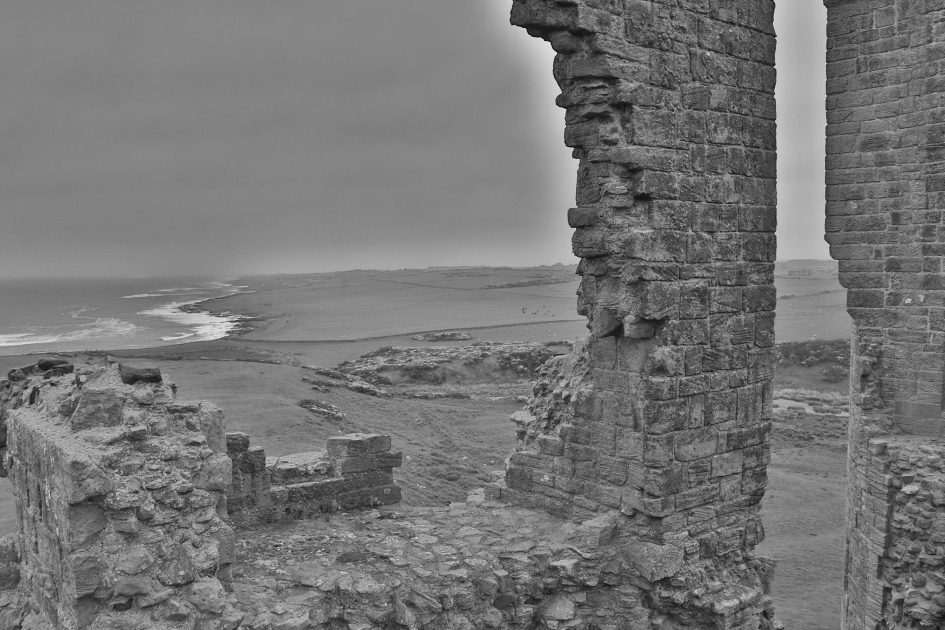
Above: Urgh! Canon EOS 80D Monochrome Picture Style with HDR Art Embossed. My eyes!
In a more welcome upgrade over its predecessor, the EOS 80D now offers in-camera interval timer facilities, bringing it in-line with Nikon’s D7x00 series. The 80D’s interval timer lets you program one to 99 shots or simply select unlimited to tell it to keep shooting until told otherwise. You can set the interval between each frame to between one second and a second shy of 100 hours, although you can’t delay the start of the process.
In another welcome upgrade (and again addressing a feature on the Nikon), the EOS 80D also now lets you film timelapse movies. Like the interval timer you can choose between one second and a second shy of 100 hours for the period between frames, along with setting the desired number of frames from two to 3600. Videos are encoded at up to 1080p resolution at either 30fps for NTSC regions or 25fps for PAL regions; as a consequence, the maximum 3600 frames will result in a timelapse movie lasting either two minutes or two minutes and 24 seconds respectively.
Moving onto the other options on the mode dial, the Green Square Auto+ mode can take care of everything for you, and if deployed in Live View can also employ more sophisticated scene detection similar to the company’s compact cameras. Meanwhile the Creative Auto, or CA mode for short, provides beginner-friendly control over depth-of-field with a touch-sensitive ‘background blur’ slider.
Set the dial to SCN and you can choose from ten scene presets, three more than the 70D: Food, Kids, Candlelight, Night Portrait, Handheld Night Scene, HDR Backlight Control, Portrait, Landscape, Close-up and Sports.
New to the 80D’s mode dial is the Creative Filter position which applies effects like miniature and toy camera. Effects were previously offered on the 70D, but you had to be in Live View to access them. On the EOS 80D you may still need to be in Live View to preview their effect, but you can now capture them while framing through the optical viewfinder if preferred. Doing so blindly does however remind me that if you were shooting with an electronic viewfinder, you’d be able to see the effect of a digital filter or colour adjustment as you composed.
Whichever way you choose to compose in Creative Filter mode though, you’ll still need to choose the actual effect – along with applying options like the strength – via the screen. The 80D gives you the choice of ten effects – again three more than the 70D: Grainy Black and White, Soft Focus, Fish Eye, Toy Camera, Miniature, Water Painting, HDR Art Standard, HDR Art Vivid, HDR Art Bold and HDR Art Embossed. The HDR options all take three photos and automatically combine them to form a single JPEG image and are, as far as I can see, identical to the options offered from the HDR menu mentioned earlier. Anyway, here’s how all ten look on the same scene.

Above: Creative Filter: Grainy B&W (left), Creative Filter: Soft Focus (right)

Above: Creative Filter: Fish eye (left), Creative Filter: Toy Camera (right)

Above: Creative Filter: Miniature (left), Creative Filter: Water Painting (right)

Above: Creative HDR Art Standard (left), Creative Filter: HDR Art Vivid (right)

Above: Creative HDR Art Bold (left), Creative Filter: HDR Art Embossed (right)
In another upgrade over the 70D, the 80D now lets you film movies with a selection of Creative Filters applied – indeed you can apply six of the ten effects, only missing out on the four HDR options. So at last you can film a miniature effect movie on an X0D DSLR, and here’s how it looks.
Above: Download the original file (Registered members of Vimeo only). Sample movie filmed with the Canon EOS 80D using its Miniature Creative Effect.
In a feature which debuted on the EOS 760D / T6s, the 80D can film HDR movies, although now in Full HD / 1080p resolution at either 25p or 30p. In HDR movie mode, the camera actually captures data at 50p or 60p, allowing it to record twice as many frames as necessary. Odd and even frames use different exposures and are combined in pairs to generate single frames with a higher tonal range, hence the final frame rate of 25p or 30p. As seen on the earlier 760D / T6s, the effect can be subtle at times, but still generally allows you to record detail in highlights which may otherwise be blown-out. Here’s an HDR Movie sample with a link to the non-HDR version.
Above: Download the original file (Registered members of Vimeo only). Sample movie filmed with the Canon EOS 80D using its HDR Movie mode. Here’s a version of the same composition with the Canon 80D HDR movie disabled. See below for a comparison of stills grabbed from each clip.


Above: Canon EOS 80D HDR Movie disabled (left), enabled (right)
I’ll end this section by noting Canon still doesn’t offer any in-camera panorama stitching on any of its cameras. I’m not sure if this is down to some kind of licensing, or perhaps a technical limitation on DSLRs but you will find the capability on Panasonic, Sony and Fujifilm bodies.
Canon EOS 80D focus and continuous shooting
The EOS 80D features powerful autofocus capabilities whether shooting through the optical viewfinder or in Live View and movies with the screen. The viewfinder AF module enjoys a significant upgrade over its predecessor, jumping from the 19-point AF system of the 70D to a new 45-point system and as before all of them are cross-type points. AF microadjustment is also available for up to 40 lenses.
The 80D’s viewfinder AF array is not just denser, but broader too, extending across a large portion of the frame. This was always an area where Nikon traditionally took the lead, but as you can see below, the EOS 80D now offers very similar viewfinder AF coverage to the D7200. Indeed while the D7200 may boast 51 AF points in total, 45 of them share essentially the same positions as the 80D’s array, leaving just three on the left and right edges to slightly widen the coverage. For the first time in this class, Canon virtually matches Nikon’s coverage and importantly all 45 of the 80D’s AF points are cross-type compared to just 15 on the D7200, and at f8, 27 of the 80D’s AF points continue to be cross-type compared with just one on the D7200. I’ve pictured their respective viewfinders below, illustrated with all AF points active.

Above left: Canon EOS 80D viewfinder, above right: Nikon D7200 viewfinder
Both the 80D and D7200 arrays are sensitive down to -3EV light levels, but it’s important to note this is a big upgrade over the EOS 70D who’s viewfinder AF only operated down to -0.5EV. The bottom line is being able to focus in much lower light levels than before.
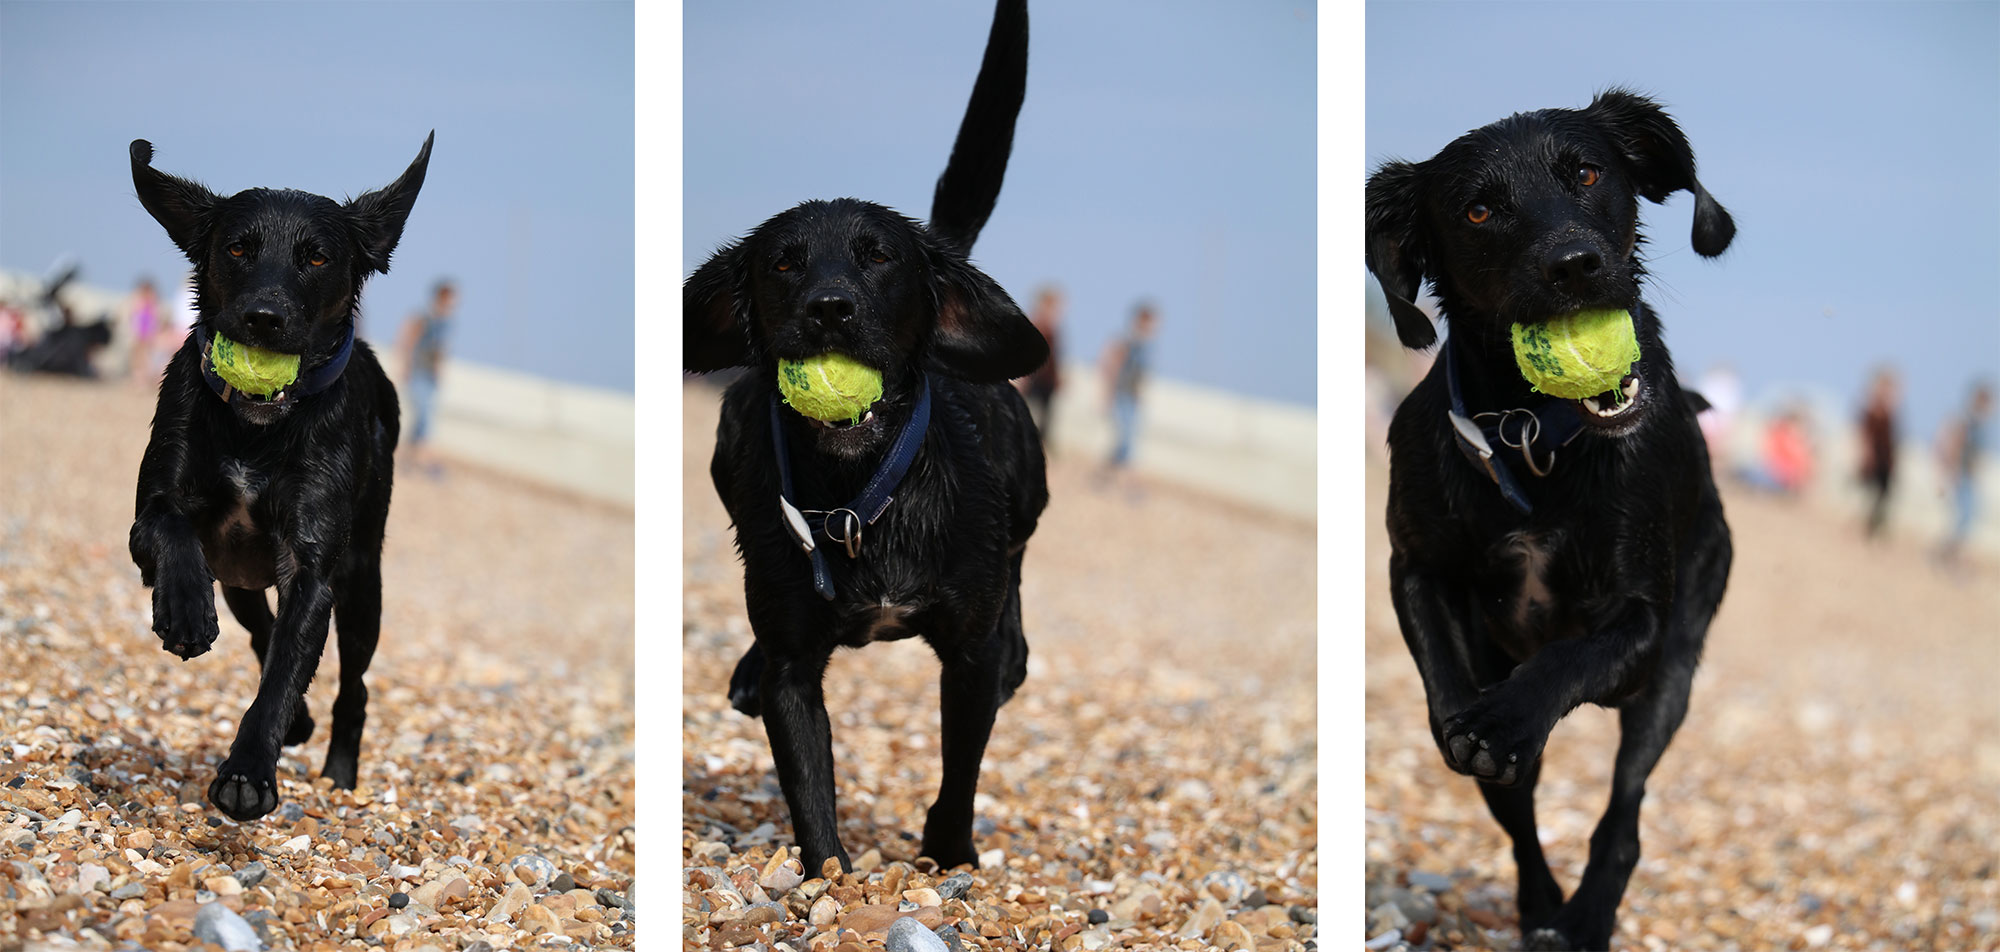
Like the 70D, there’s a dedicated button next to the shutter release to select how the AF points are arranged. As before you can choose Single, Zone (nine) or 45-Point (all areas), with the addition of a new Large Zone option which essentially splits the array into three sections, left, middle or right. In all modes other than Single area, the 80D deploys colour tracking to help identify a subject. Skin tones and face detection are used to prioritise human subjects, otherwise the camera tends to focus on the closest subject in the active area. In this shot of Humphrey, the contrast of the dark fur against a light background and the ball in his mouth provided plenty for the camera to track.
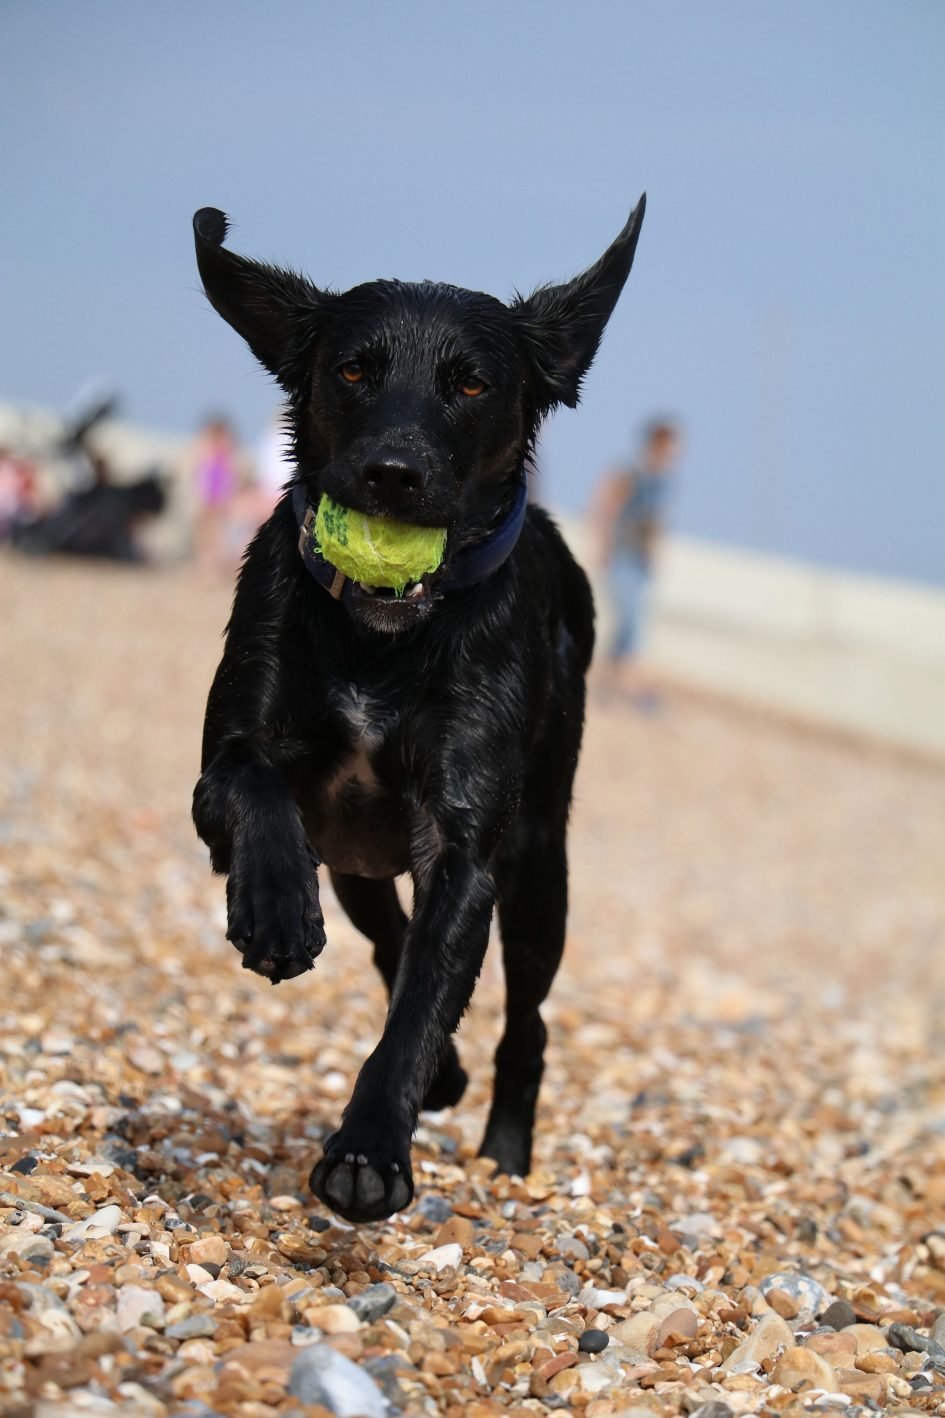
Above: Canon EOS 80D and EF-S 18-135mm at 135mm, Continuous AF / 1/2000 / f5.6 / 400 ISO
I tested the EOS 80D with the EF-S 18-135mm STM kit zoom, EF 50mm f1.8 STM and EF 85mm f1.8 USM lenses, and found the combinations sufficiently effective in AI Servo mode to track on-coming dogs, runners, cyclists, vehicles or birds in flight and deliver a high hit rate. I enjoyed the greatest success with predictable motion and the Single AF area mode. Zone AF proved less successful in my tests, either failing to keep-up with the action or focusing on the ground in front of the subject instead. Nikon’s 3D Tracking AF algorithm still feels superior in this regard and is available on the D7200, proving it’s not just about how many AF points you have, but how you read and drive them. That said, there’s only so far either body will be able to drive a kit zoom, so for the best response you should couple them with a faster focusing high-end lens.
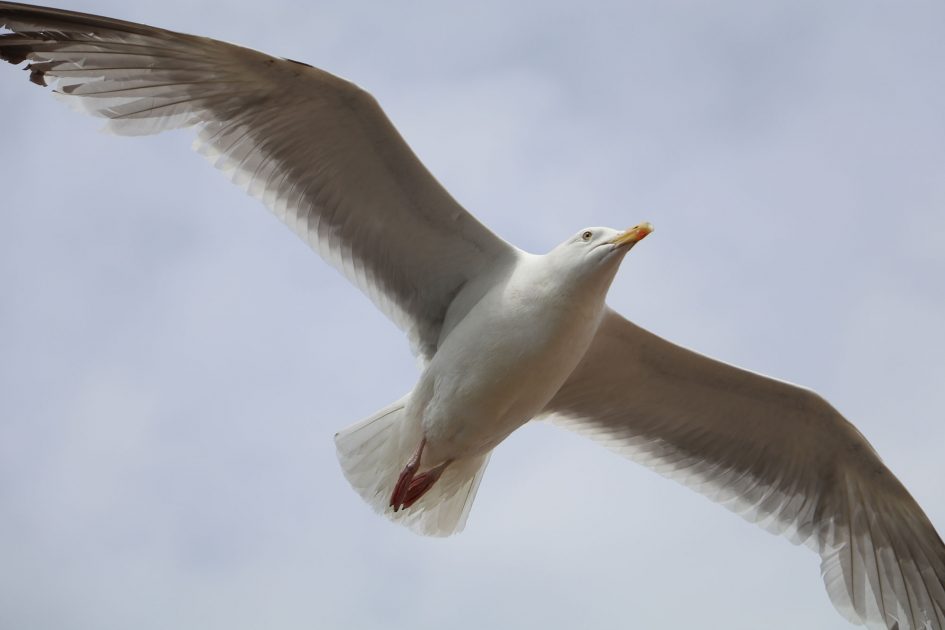
Above: Canon EOS 80D and EF-S 18-135mm at 135mm: Continuous AF / 1/1000 / f5.6 / 100 ISO
As you’d expect, the 80D also lacked the initial speed of acquisition and tracking confidence of higher-end models like the EOS 7D Mark II or Nikon D500, so if you’re really into sports, you should aim for one of these instead – in particular the 7D Mark II and 80D are currently fairly close in price. I’d also like to compare the old version of the EF-S 18-135mm kit zoom against the new Nano-USM version as Canon claims the focusing through the viewfinder is up to four times faster than the STM version. But despite some misses and a visible difference between it and higher-end bodies, I did manage to capture plenty of action with the EOS 80D and appreciated having its broader, denser and more sensitive array.
To illustrate the 80D’s continuous AF with the EF-S 18-135mm STM kit zoom in practice, here’s two examples of bursts. The first features one of Brighton’s many seagulls flying straight towards me. You can see the entire frame, followed by 100% crops and in the series of 16, only one is really out of focus. Two more are a little off, but the camera could have been tracking a different part of the body as other sectins are sharp.
Canon EOS 80D CAF series with EF-S 18-135mm STM at 135mm


In the next sequence below I’ve included nine frames of Humphrey bounding towards me. Again I found the single AF area proved more successful than Zone and so long as I kept it over his body or face, the 80D and kit zoom managed to keep-up and deliver a high degree of keepers. I’ve not included 100% crops for these, but all are sharp.
Canon EOS 80D CAF series with EF-S 18-135mm STM at 135mm
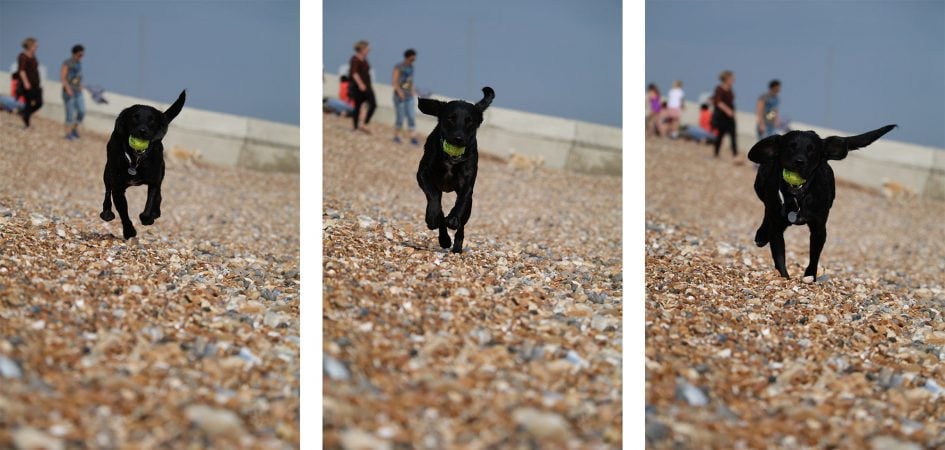
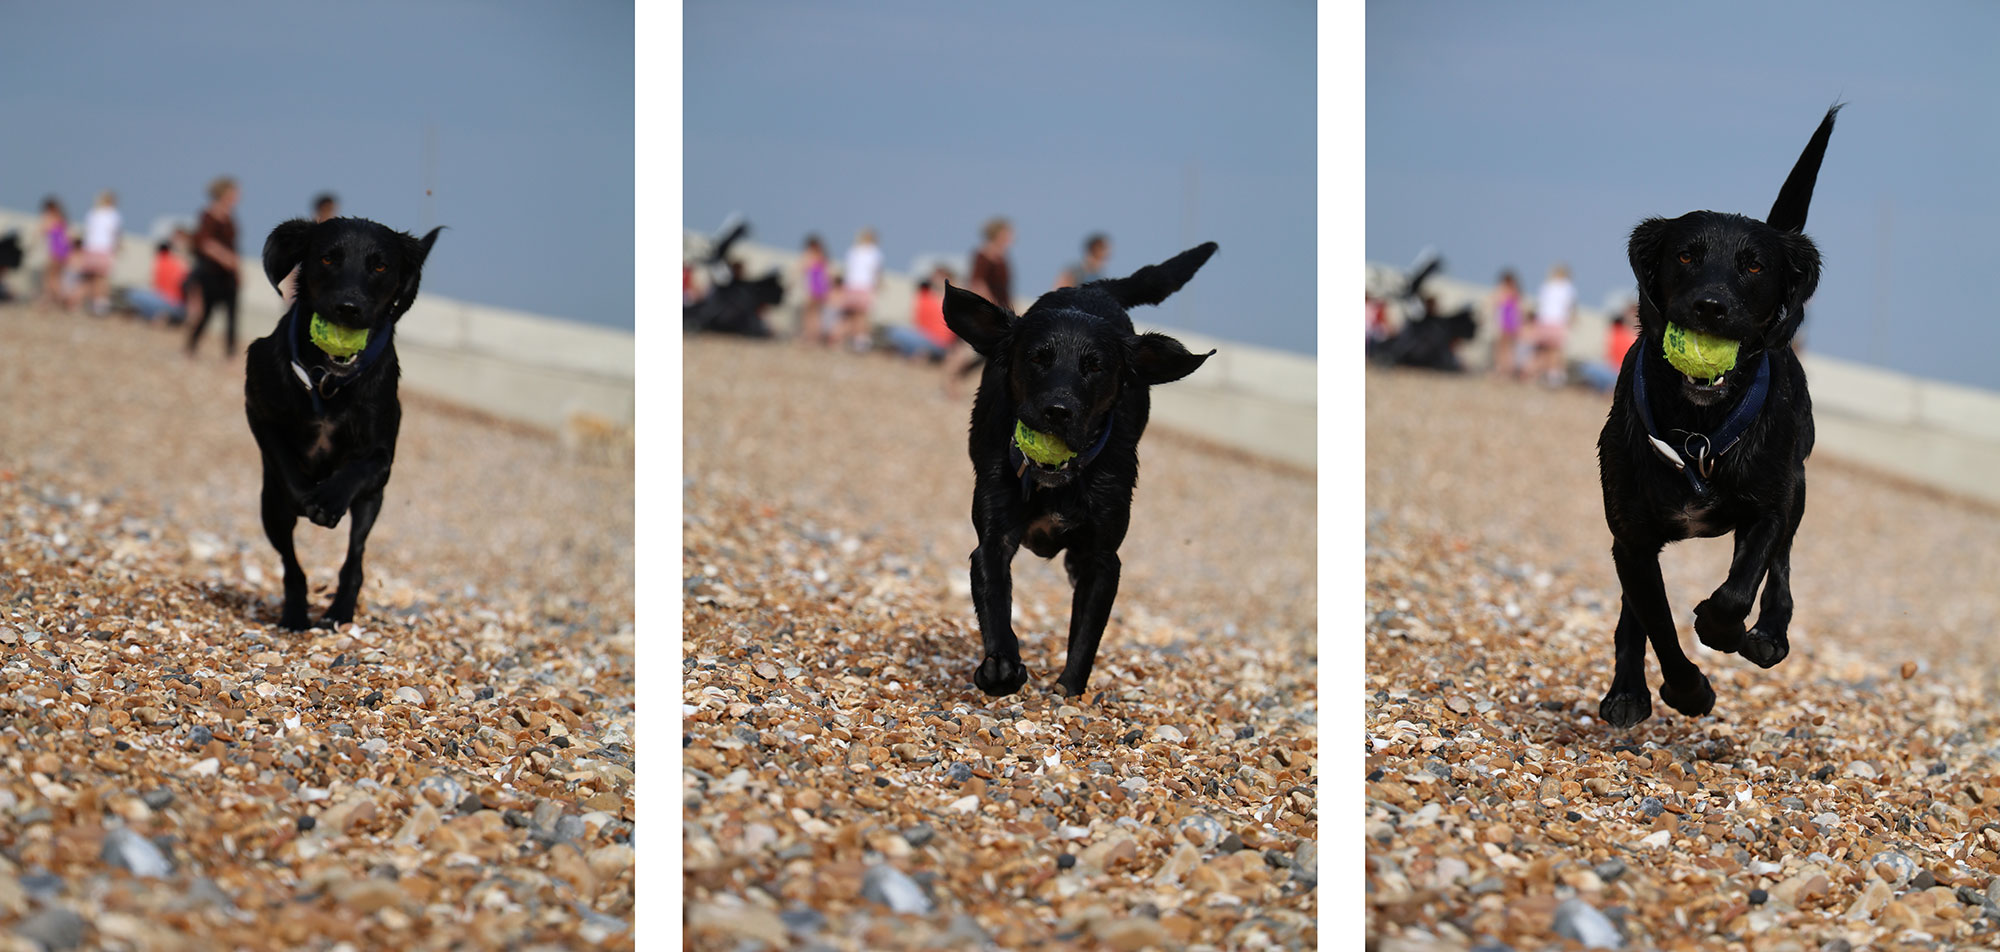
Moving onto Live View and movie AF, the EOS 80D becomes Canon’s latest body to feature a sensor with Dual Pixel CMOS AF. Like the EOS 70D, 7D Mark II and 1Dx Mark II before it, Dual Pixel CMOS AF allows imaging pixels on the sensor to temporarily redeploy themselves as phase-detect AF points before converting back again afterwards to capture the image. In practice Canon allows 80% of the frame to offer phase-detect coverage in Live View and for movies, equipping it with the confidence to know which direction to focus and when to stop with little or no visible hunting.
Dual Pixel CMOS AF, originally introduced on the 70D, continues to be a highlight on the 80D and a key differentiator with other cameras. In Live View when fitted with an STM lens, the EOS 80D feels as quick as most native mirrorless cameras, snapping-onto subjects swiftly and confidently wherever they are on the frame. Face detection becomes responsive and usable even with large aperture lenses. Shooting bursts is also quicker than you’d expect for a DSLR in Live View, although the time taken to return to Live View after shooting an image was typically slower than a native mirrorless camera.
Subject tracking works pretty well, so long as it’s not moving too quickly towards or away from you. In my tests people walking (even purposefully) were fine as were leisurely cyclists, kids or pets. Start running, cycling or driving faster though and I found the EOS 80D struggled with continuous AF in Live View, returning a much lower success rate. As the action speeds-up even slightly, I’d strongly recommend shooting through the viewfinder instead.
For me Dual Pixel CMOS AF really comes into its own when filming video where it’ll refocus smoothly and confidently. As before you can track human subjects with face detection, which means it becomes one of the best cameras for event videographers as well as vloggers, especially as you can turn the screen back to face the subject. Whether you’re filming a piece to camera where you walk towards the camera, or are capturing the happy couple as they march up the aisle, the 80D will keep the subject in focus without distracting hunting.
Like the EOS 70D you can use the touch-screen to tap to pull-focus, but new to the 80D is the ability to adjust the Servo AF speed and Tracking Sensitivity for movie autofocus. The former ranges from -6 to +2 and I have three focus-pulling videos filmed with the EF 50mm f1.8 STM at the default zero, the fastest +2 and slowest -6 settings.
Above: Download the original file (Registered members of Vimeo only). Sample movie filmed with the Canon EOS 80D using the EF 50mm f1.8 STM opened to f1.8. In this clip I have the Movie Servo AF set to the default Zero option. See below for videos demonstrating the slowest and fastest options.
Above: Download the original file (Registered members of Vimeo only). Sample movie filmed with the Canon EOS 80D using the EF 50mm f1.8 STM opened to f1.8. In this clip I have the Movie Servo AF set to the slowest -6 option. See below for a video demonstrating the fastest option.
Above: Download the original file (Registered members of Vimeo only). Sample movie filmed with the Canon EOS 80D using the EF 50mm f1.8 STM opened to f1.8. In this clip I have the Movie Servo AF set to the fastest +2 option. See above for videos demonstrating the slower options.
The ability to adjust the movie AF speed, not to mention how quickly it responds to subjects that may enter the frame give the 80D a neat advantage over the 70D, although it’s a feature we’ve seen before on the Sony A6000 at half the price or on the newer A6300 which also offers 4k video. Indeed while they employ different technologies and form factors, the Sony A6000 and A6300 are the only serious rivals for the EOS 80D when it comes to movie AF. At first Sony would appear to enjoy the advantage with price on the A6000 and 4k on the A6300, but neither has a touch-screen, nor can swivel their screens back to face the subject. So despite its lack of 4k, the combination of great movie AF and a fully-articulated touchscreen on the 80D will seal the deal for many videographers. I’ll discuss the other movie capabilities of the EOS 80D later in the review.
Before moving onto continuous shooting speeds, I should give a brief mention to manual focusing assistance on the screen. Canon has long-offered a nice clean magnified view in Live View with its DSLRs and the 80D is no different with two different magnifications that let you confirm focus. Annoyingly though, there’s still no focus peaking available to help manual focus – a boon when filming movies. I’m not sure if it’s a technical or licensing restriction, but it’s revealing neither Canon nor Nikon offer it on DSLRs whereas peaking is common across most mirrorless cameras. Either way it’s an omission to be aware of if you’re likely to manually focus while filming movies. Thankfully the movie AF is so good you may rarely need to manually focus.
Now it’s time to discuss continuous shooting speed. The EOS 80D is quoted as shooting at 7fps for up to 110 JPEGs or 25 RAW images (with a UHS-I card). This is the same speed as the 70D before it, but its predecessor quoted a smaller buffer of 65 JPEGs or 16 RAW files, possibly due to slower memory cards. Meanwhile Nikon’s D7200 – and the D7100 before it – shoot at a top speed of 6fps, boostable to 7fps if you choose the 1.3x cropped mode.
To put them to the test I fitted both the EOS 80D and D7200 with the same UHS card, set their shutter speed to 1/500, sensitivity to 400 ISO, then timed a series of bursts. With the EOS 80D set to Large Fine JPEG, I managed to shoot 114 frames in 16.19 seconds before the speed became slightly erratic, albeit continuing. During this initial burst, the rate worked out at almost exactly 7fps.
Switching to RAW (14-bit), the EOS 80D captured 25 frames in 3.46 seconds for a rate of 7.2fps. Meanwhile in Live View continuous mode, I shot 90 JPEGs in 13.33 seconds for a rate of 6.8fps.
Turning to the Nikon D7200, I fired-off 37 Large Fine JPEGs in 5.82 seconds for a rate of 6.4fps. Switching to 14-bit RAW with lossless compression allowed me to capture 13 frames in 2.35 seconds for a rate of 5.5fps. And in Live View, the D7200 managed 50 JPEGs in 12.88 seconds for a rate of 3.9fps.
Just glancing at these figures proves the EOS 80D can out-perform the D7200, but there are a couple of things to note. First, when set to its best quality mode, the D7200’s JPEGs are roughly twice the size as those form the 80D – 15MB versus 7MB in my test – so its buffer understandably fills-up faster. If you were to reduce the quality of the D7200 JPEGs, perhaps by using stronger compression, so they roughly matched the 80D file size, then you’d be able to shoot for longer bursts. It’s also worth noting how slowing the shooting speed – as happens in Live View – allows the D7200 to tackle its images in real-time and keep shooting for much longer.
The bottom line is regardless of image quality, the 80D is shooting a little faster than the D7200, but if you fancy something noticeably quicker, consider the Canon EOS 7D Mark II which only costs a little more at the time of writing and boasts 10fps. Or Sony’s Alpha A6300 mirrorless which can shoot at 11fps with some viewfinder lag, or at 8fps with real-time updates through the viewfinder.
Canon EOS 80D Wifi
The EOS 80D is equipped with Wifi and in an upgrade over its predecessor, adds NFC to aid the initial negation with compatible handsets or Canon’s Connect Station storage device. The implementation is similar to earlier models, although since the 70D was launched, Canon has moved to a unified remote control app for both DSLRs and compacts called Camera Connect, available free of charge for iOS and Android platforms. I tested the Android version on my Samsung Galaxy S7 which also supported NFC initiation by touching the two devices together for a moment.
Wifi on the EOS 80D isn’t just for remote controlling the camera with a smartphone or tablet though – it can also be used to transfer images directly between cameras, save images to Canon’s Connect Station device, wirelessly control the camera with a Mac or Windows computer, print wirelessly, playback images on a DLNA device like a Wifi-equipped TV, or to connect directly to the internet and share images on various networks via Canon’s Image Gateway.
I’ll concentrate on the smartphone and computer remote control here, starting with the former and the Camera Connect app which must first be installed on your handset. Once installed, owners of NFC handsets – like my Galaxy S7 – need only touch the two devices together (ensuring the NFC logos on each are close) to initiate a connection. If you don’t have NFC, just choose ‘Connect to Smartphone’ from the Wifi Function menu on the camera for the 80D to broadcast a network for your phone to connect to manually.
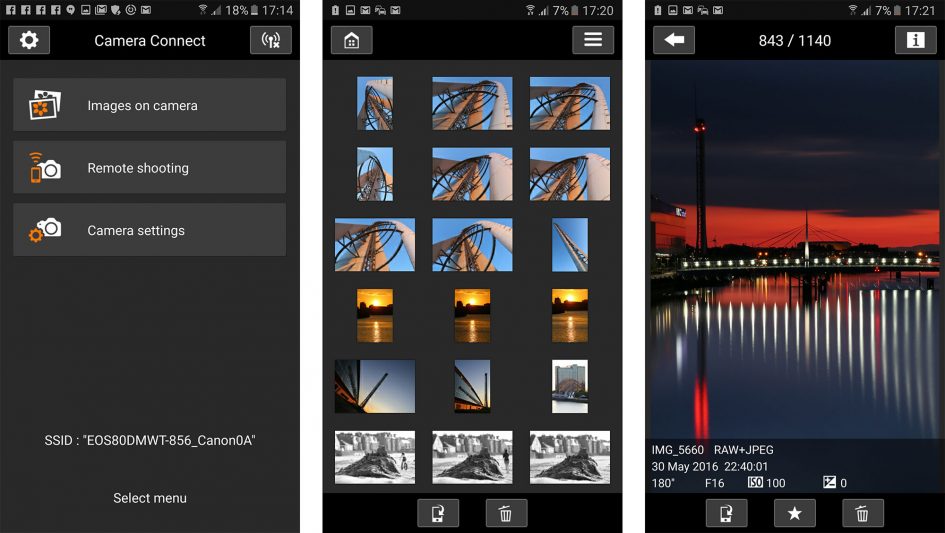
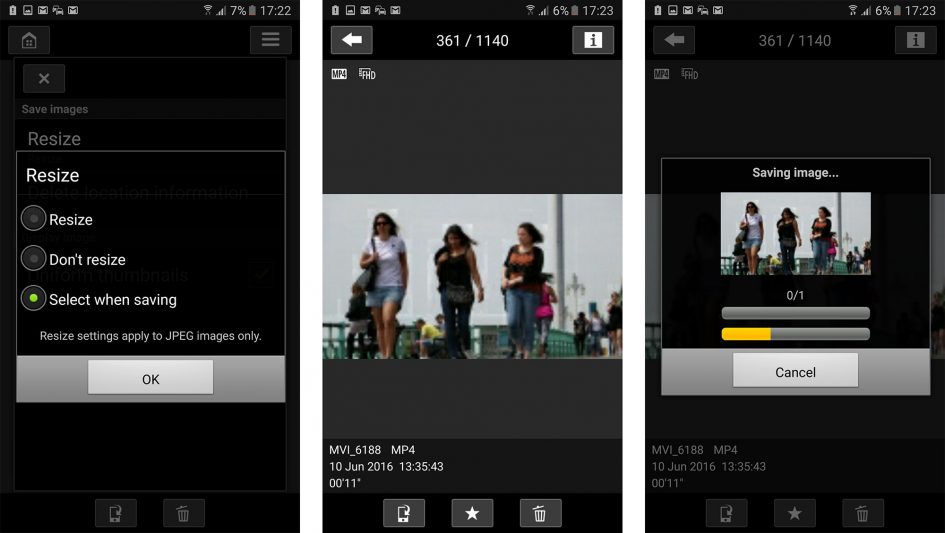
Once connected to the 80D, the Camera Connect app shows three main options: Images on Camera, Remote Shooting and Camera Settings. Selecting Images on Camera fires-up a thumbnail view of the images on the camera’s card, including JPEGs and movies but not RAW files. You can then tap a thumbnail to view a full-screen version with basic shooting information, then save it to your phone if desired. In an important upgrade over the earlier app, you can now save the original JPEG image without resizing if desired, or go for a resized version which, on my phone, measured 1920×1280 pixels. You can set a preference going forward or go for an option which prompts you to choose a resized or original version each time you transfer an image.
It’s also possible to access movie files and copy them across too in their original format. I tried this with an 11 second Full HD 1080p movie file which measured around 90MB and played back smoothly on my Galaxy S7; Instagram was also happy to share videos copied over from the 80D this way.
Select Remote Shooting from the main app menu and you’ll see a live image from the camera on your phone, with the chance to tap anywhere on the frame to refocus if desired (a double-tap presents a magnified view for further confirmation). The Camera Connect app also offers full exposure control depending on the mode set on the camera’s dial. If the mode dial is set to Manual, you’ll be able to remote control the shutter, aperture and ISO all from your phone, then tap the remote shutter release to take a shot.
You can also manually nudge the focus back and forth, and if you’re using the new EF-S 18-135mm IS USM lens with the PZ-E1 adapter, you should also be shown a slider to remotely operate the motorized zoom. I say should as I was not provided with this lens to try with the 80D during my tests, but I’m told it looks and works on the app as if you were controlling the motorized zoom on a compact camera.
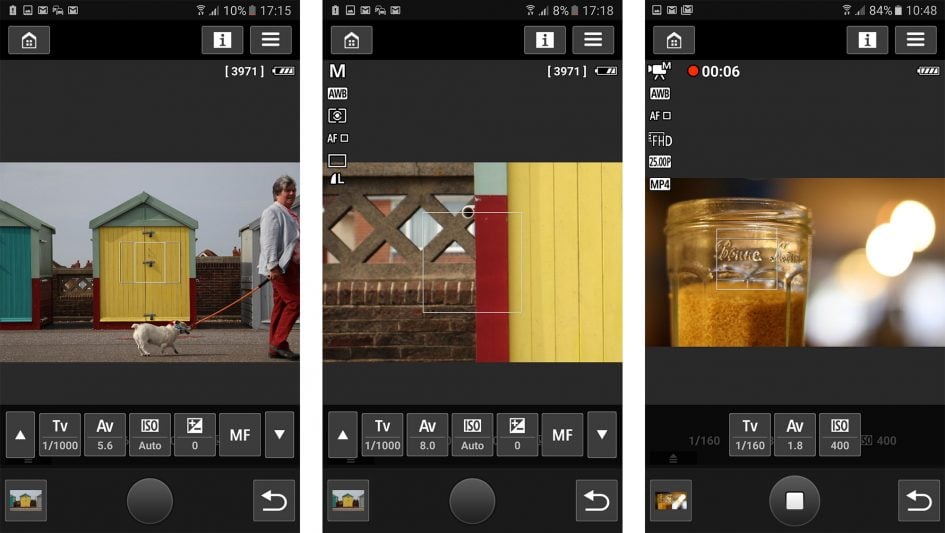
Tap the mobile menu in the top right corner of the app and you’ll find an option to start remote movie recording. Doing so reframes the live image in 16:9 and lets you remotely control the exposure and keeps the touch-AF active. This allows you to remotely pull-focus by tapping the phone’s screen as you film a video and I have an example below taken with the EF 50mm f1.8 STM lens wide-open. Note the movie is still recorded on the camera’s memory card for bandwidth reasons, but can subsequently be copied wirelessly onto your phone for viewing and sharing if desired.
Above: Download the original file (Registered members of Vimeo only). Sample movie filmed with the Canon EOS 80D in its 1080 / 25p / IPB mode at 400 ISO. I used the EF 50mm f1.8 STM lens at f1.8 in Manual mode, and set the Movie Servo AF speed to Normal (0). I connected the camera to my phone and used the Camera Connect app to pull focus by tapping the phone’s screen.
The third option of the Camera Connect app accesses camera settings, but these are simply related to the clock and area, allowing you to adjust them remotely or sync them with the phone. What you won’t find though is any option to create and synchronise a GPS log, which is frustrating as I believe the same app does allow it when connect to Canon’s compact cameras. I’ve asked Canon for clarification, but have no explanation other than location information not being available for EOS models.
Maybe Canon’s strategy is to encourage EOS owners to buy the optional GPS receiver accessory, I can only speculate. But the bottom line is Canon’s Wifi app is one of the few that doesn’t offer any kind of location logging for its interchangeable lens cameras; interestingly Sony is another. It’s a shame an otherwise capable app (on both systems) is limited in this way.
Moving on, the EOS 80D allows you to connect the body directly to a network and share images without going through your phone or computer. As before, your images are actually uploaded first to Canon’s Image Gateway service which then shares them onto third party networks including Facebook, Twitter, YouTube, Flickr, Google Drive and or email. While the 80D makes text-entry fairly easy with its touch-screen. Most of the services are setup before-hand using a Web Services application and the Image Gateway website itself, so when you come to share directly from the camera, there’s little more to do other than select the desired Web Service on the 80D’s menus.
With the EOS 80D connected to my own home broadband router, it took about 14 seconds to send a 7MB JPEG image to Canon’s Image Gateway which then reshared it to the selected social networks seconds later. When uploading to flickr, images are uploaded into a separate Canon Image Gateway album, with a link in the caption back to Image Gateway. You can then edit and share as required.
As mentioned earlier, you can also use Wifi to wirelessly remote control the EOS 80D using the free EOS Utility application for Windows and MacOS computers. The EOS Utility is one of the lesser-known highlights of owning a Canon DSLR. With the camera connected to your computer, whether wirelessly or over USB, the EOS Utility lets you remote control pretty much any function or setting of the camera that doesn’t involve turning a physical switch or dial.
As before you can fire-up a large Live View window with a high resolution live image, remote focus (manually nudging it back or forth of going for auto and clicking the desired region with the computer’s mouse), take photos and have them recorded to the computer, camera or both, or trigger movie recording, although videos are still only recorded to the internal memory card. You can also set up an interval timer, although the 80D now offers the facility in-camera. In Live View Shooting you can load an optional overlay image for lining up compositions, and there’s also a leveling gauge.
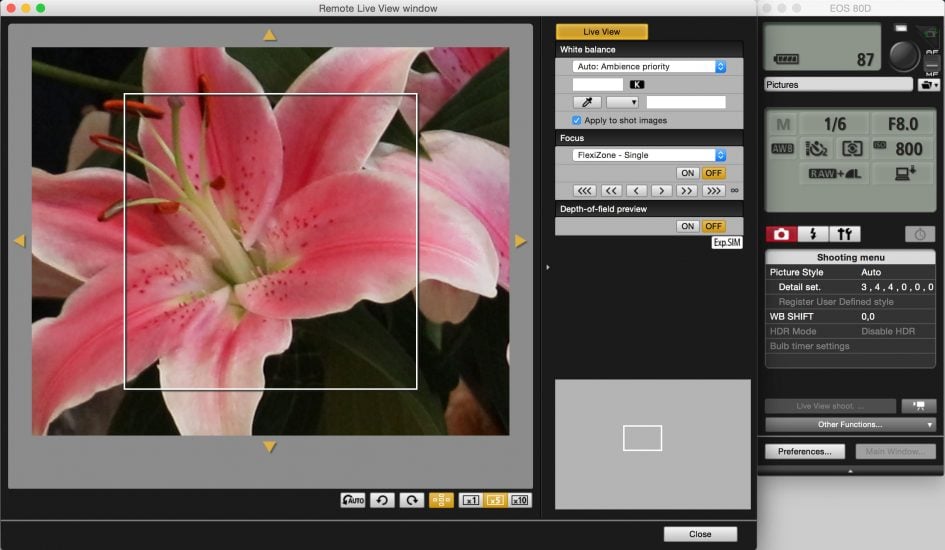
On previous generations if you wanted to control the DSLR over Wifi using the EOS Utility, it had to be via a router or hub, which limited wireless operation to home, office or studio use. But since the 70D, it now also works with a direct peer-to-peer connection between camera and computer. This means you can wirelessly remote control the 80D with a laptop, literally in the field. I tried it in my house, remote controlling the camera from different rooms or even floors with my MacBook Pro, although understandably as the range increased, the live view refresh and speed of transferring images (if enabled) reduced. So while wireless control is cool, you should still use a USB cable for the best and most responsive experience.
Canon EOS 80D movie mode
The EOS 80D builds-upon the earlier 70D to deliver one of the best movie experiences around. I’ll break the bad news right now and say the 80D still doesn’t have 4k video nor focus peaking nor even high frame rates for slow motion, but in every other regard it’s a delight. You can film 1080p at 24, 25 and 30p with inter or intra-frame compression and in a big upgrade over the 70D you can also film 1080 at 50p and 60p, albeit with inter-frame compression only. 720p is also available at 25, 30, 50 or 60p, all with inter-frame compression.
Like other Canon DSLRs you can film with full manual control over exposure, adjusting aperture, shutter and ISO as desired, or opting for fully automatic. In Manual it’s also possible to lock the aperture and shutter and deploy Auto ISO to balance varying light conditions. In terms of high ISO noise, here’s a clip I filmed at 1600 ISO, followed by 100% crops made from it and other versions up to 12800 ISO; opposite them I’ve pictured crops from the Nikon D7200’s movie mode at matching sensitivities for comparison.
Above: Download the original file (Registered members of Vimeo only). Sample movie filmed with the Canon EOS 80D in its 1080 / 24p mode at 1600 ISO. Here’s the same scene at 3200 ISO, 6400 ISO and 12800 ISO. You can see 100% crops taken from each clip below alongside versions filmed with the Nikon D7200 for comparison.

Above left: Canon EOS 80D, above right: Nikon D7200. Both 100% crops from 1080 / 24p video at 1600 ISO

Above left: Canon EOS 80D, above right: Nikon D7200. Both 100% crops from 1080 / 24p video at 3200 ISO

Above left: Canon EOS 80D, above right: Nikon D7200. Both 100% crops from 1080 / 24p video at 6400 ISO

Above left: Canon EOS 80D, above right: Nikon D7200. Both 100% crops from 1080 / 24p video at 12800 ISO
As before there’s an external microphone input and the chance to adjust audio levels, but in another upgrade over the 70D – and importantly bringing it in-line with the D7100 and D7200 – there’s now also a headphone jack.
Filming 1080p or 720p takes the full sensor width and scales it down to the desired resolution without any field-reduction, although the 80D does offer a Digital Zoom option which starts with a perfect 1:1 crop from the middle of the frame (for roughly 3x magnification) before scaling it electronically up to 10x with progressively lower quality. Here are three crops taken from the middle of the frame filmed in 1080p normally on the left, with the Digital Zoom at minimum in the middle (roughly 3x) and with the Digital Zoom at the maximum on the right (roughly 10x). It’s clear that while the 10x version unsurprisingly has no finer detail than the 3x version, the latter is genuinely capturing more resolution than full-frame footage. As such it’s a handy option for a clean 1080p crop when you need more reach without any loss in video quality.

Above: Canon EOS 80D Digital Zoom full view (left to right: off, 3x, 10x)
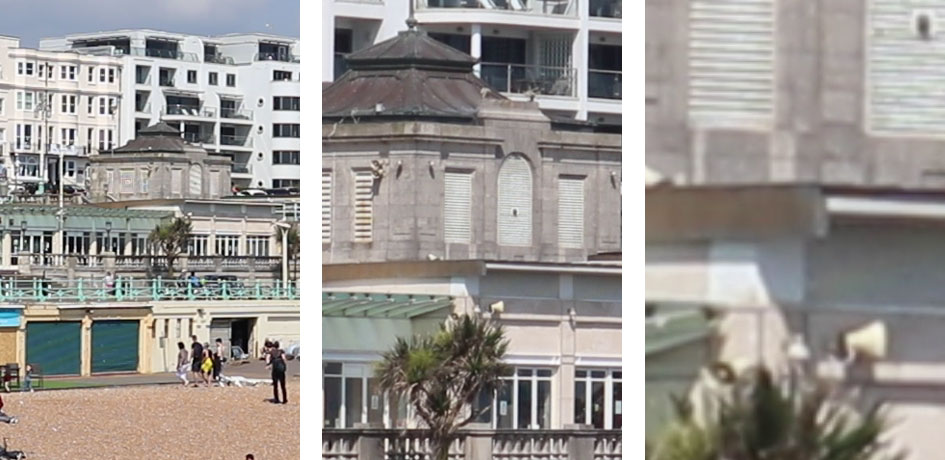
Above: Canon EOS 80D Digital Zoom 100% cropped view from middle (left to right: off, 3x, 10x)
Previously the 70D didn’t allow you to deploy any of the Creative Filters while filming video, but now the 80D unlocks a number of options for movies. You can choose to film movies with Memory, Dream, Old Movies, Dramatic B&W, and finally, Miniature effects, and as noted in the shooting mode section you can also film HDR movies in 1080p at 25p or 30p. I showed an example of the Miniature effect applied to movies earlier in the review, so here’s a couple of the others for you.
Above: Download the original file (Registered members of Vimeo only). Sample movie filmed with the Canon EOS 80D using its Old Movies Creative Effect. Here are examples with the other effects: Canon 80D Dramatic B&W movie, Canon 80D Dream movie, Canon 80D Memory movie.
What makes the 80D’s movie mode really special though is the autofocusing capabilities delivered by Canon’s Dual Pixel CMOS AF system. As explained in the AF section earlier, 80% of the sensor’s pixels double-up as phase-detect AF points, allowing the camera to confidently refocus without hunting. The touchscreen interface also lets you tap just about anywhere and have the camera refocus on that point, or track a moving subject, such as an approaching face. This is ultimately what consumers expect a movie mode to be able to do, but sadly it’s something that continues to elude many cameras, especially Nikon’s DSLRs.
Dual Pixel CMOS AF made its debut on the EOS 70D and has since been deployed on the EOS 7D Mark II, but new to the 80D is the ability to use it on 1080p at the maximum frame rates of 50p and 60p, along with compatibility with the entire EF lens catalogue versus just the recent lenses; note for the smoothest movie refocusing though, try to stick with canon’s STM lenses.
You can also now adjust the refocusing speed and tracking sensitivity and I posted examples in the autofocus section of the review. It’s also possible to remotely pull-focus by tapping the screen of a Wifi-connected smartphone – see the earlier Wifi section for an example. I have several more examples of the continuous AF in action in a moment.
Just before my movie samples, a quick note on the competition. Nikon’s D7200 doesn’t offer 4k video, nor does it offer any kind of convincing movie AF or an articulated screen, so clearly the 80D is the preferable choice. But in the mirrorless camp there are several key alternatives. Panasonic may not be able to refocus quite as confidently as the EOS 80D, but it does offer 4k video, focus-peaking and fully-articulated touch-screens on models starting with the Lumix G7 at roughly half the price; indeed for only a little more than the 80D you could alternatively get the Lumix GH4 with 4k in UHD and Cinema4k varieties, along with 1080 at 96fps for slow motion and flatter profiles for subsequent grading. Then there’s Sony’s A6300 which for a tad less than the 80D will match its confident refocusing with the addition of 4k video, 1080p at up to 120fps, focus-peaking and flat profiles, albeit with a screen that only tilts vertically, isn’t touch-sensitive and not accompanied by a headphone jack. There’s pros and cons to all to weigh-up.
I do however find it interesting that despite the onward march of mirrorless, cameras like the EOS 70D and EOS 80D are still two of the best options for vloggers simply because you can flip the screens forward to face the subject and be sure the AF will keep you in focus as you move towards or away from the camera or around its frame.
So now without further ado, here are a selection of additional movie clips filmed with the EOS 80D and the EF-S 18-135mm STM kit zoom.
Above: Download the original file (Registered members of Vimeo only). Sample movie filmed with the Canon EOS 80D in its 1080 / 24p / IPB mode at 100 ISO. I used the EF-S 18-135mm STM lens at 28mm f8 in Manual mode. I have another version filmed with All-i compression. See my Canon EOS 80D All-i movie sample.
Above: Download the original file (Registered members of Vimeo only). Sample movie filmed with the Canon EOS 80D in its 1080 / 50p / IPB mode at 100 ISO. I used the EF-S 18-135mm STM lens at 135mm f5.6 in Manual mode and tapped various subjects to track.
Above: Download the original file (Registered members of Vimeo only). Sample movie filmed with the Canon EOS 80D in its 1080 / 50p / IPB mode at 100 ISO. I used the EF-S 18-135mm STM lens at 135mm f5.6 in Manual mode, and set the Movie Servo AF speed to Normal (0).
Above: Download the original file (Registered members of Vimeo only). Sample movie filmed with the Canon EOS 80D in its 1080 / 25p / IPB mode at 800 ISO. I used the EF-S 18-135mm STM lens at 18mm f4 in Manual mode.
Canon EOS 80D sensor and processing
The EOS 80D employs a 24 Megapixel APS-C sensor, capable of recording stills with 6000×4000 pixels at up to 7fps, or video up to 1080 / 60p. That’s four Megapixels more than the EOS 70D and EOS 7D Mark II, bringing it in-line with rival APS-C cameras which made the move to 24 Megapixels at least a generation ago. To be fair, you’d be hard-pushed to notice much difference in real-life detail between 20 and 24 Megapixels in practice, so I suspect the boost is more to compete in terms of specification numbers against the competition.
JPEGs and RAW files can be recorded it three different resolutions, and JPEGs with the choice of two different compression quality settings. It’s possible to choose the JPEG and RAW quality independently. Unusually for a DSLR, it’s also possible to change the aspect ratio from a choice of 3:2 (the native shape), 16:9, 4:3 or 1:1. When composing in any of the three cropped aspect ratios, lines appear in the viewfinder to indicate the new coverage; in Live View on the screen, the new shape is previewed.
The sensitivity runs between 100 and 16000 ISO, the upper limit a slightly odd one-third EV increase over the 12800 ISO maximum of its predecessor. A High option is also available, extending the top sensitivity to 25600 ISO. I have a full comparison between the EOS 80D and Nikon D7200 sensitivities in both JPEG and RAW in my Canon 80D noise results. Auto ISO is also available, allowing you to set the minimum and maximum value, along with a minimum shutter speed. If the minimum shutter is set to Auto, the camera can take the lens focal length into account to avoid camera shake, but like most cameras to date, it’ll ignore the presence of Image Stabilisation.
Colour Tone, Saturation, Contrast and Sharpness (with separate controls over the strength, fineness and threshold) are all adjustable via a selection of Picture Styles, while the Monochrome presets additionally unlock Filter and Toning effects. I’m fond of shooting with high-contrast black and white, so I’m always interested to see how a camera handles the processing. Here’s a couple of images out-of-camera using the 80D’s Monochrome preset and Red filter effect to darken the sky.
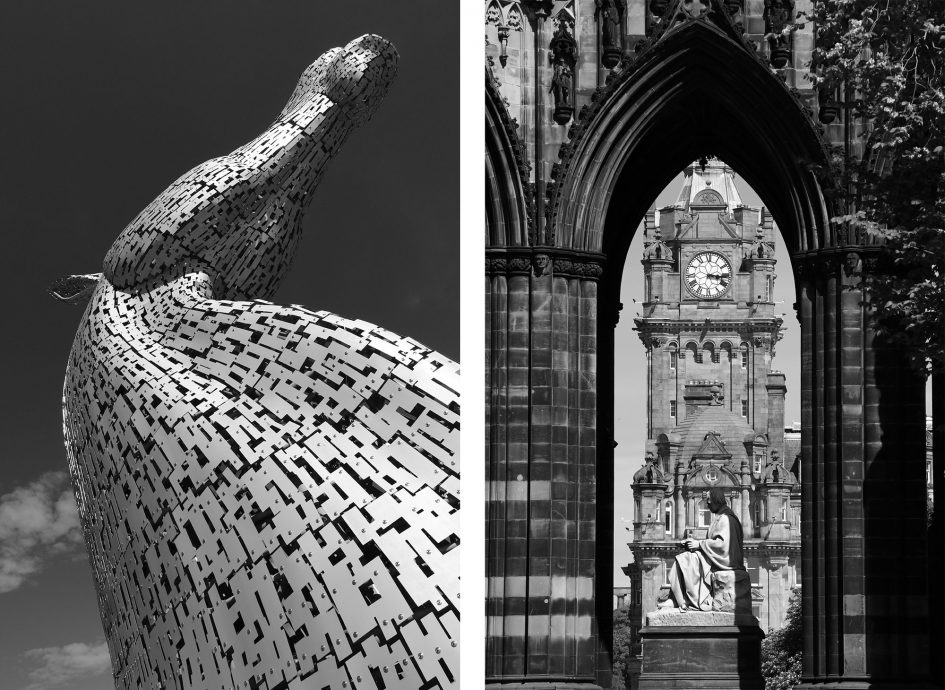
Above: Canon EOS 80D Monochrome Picture Style
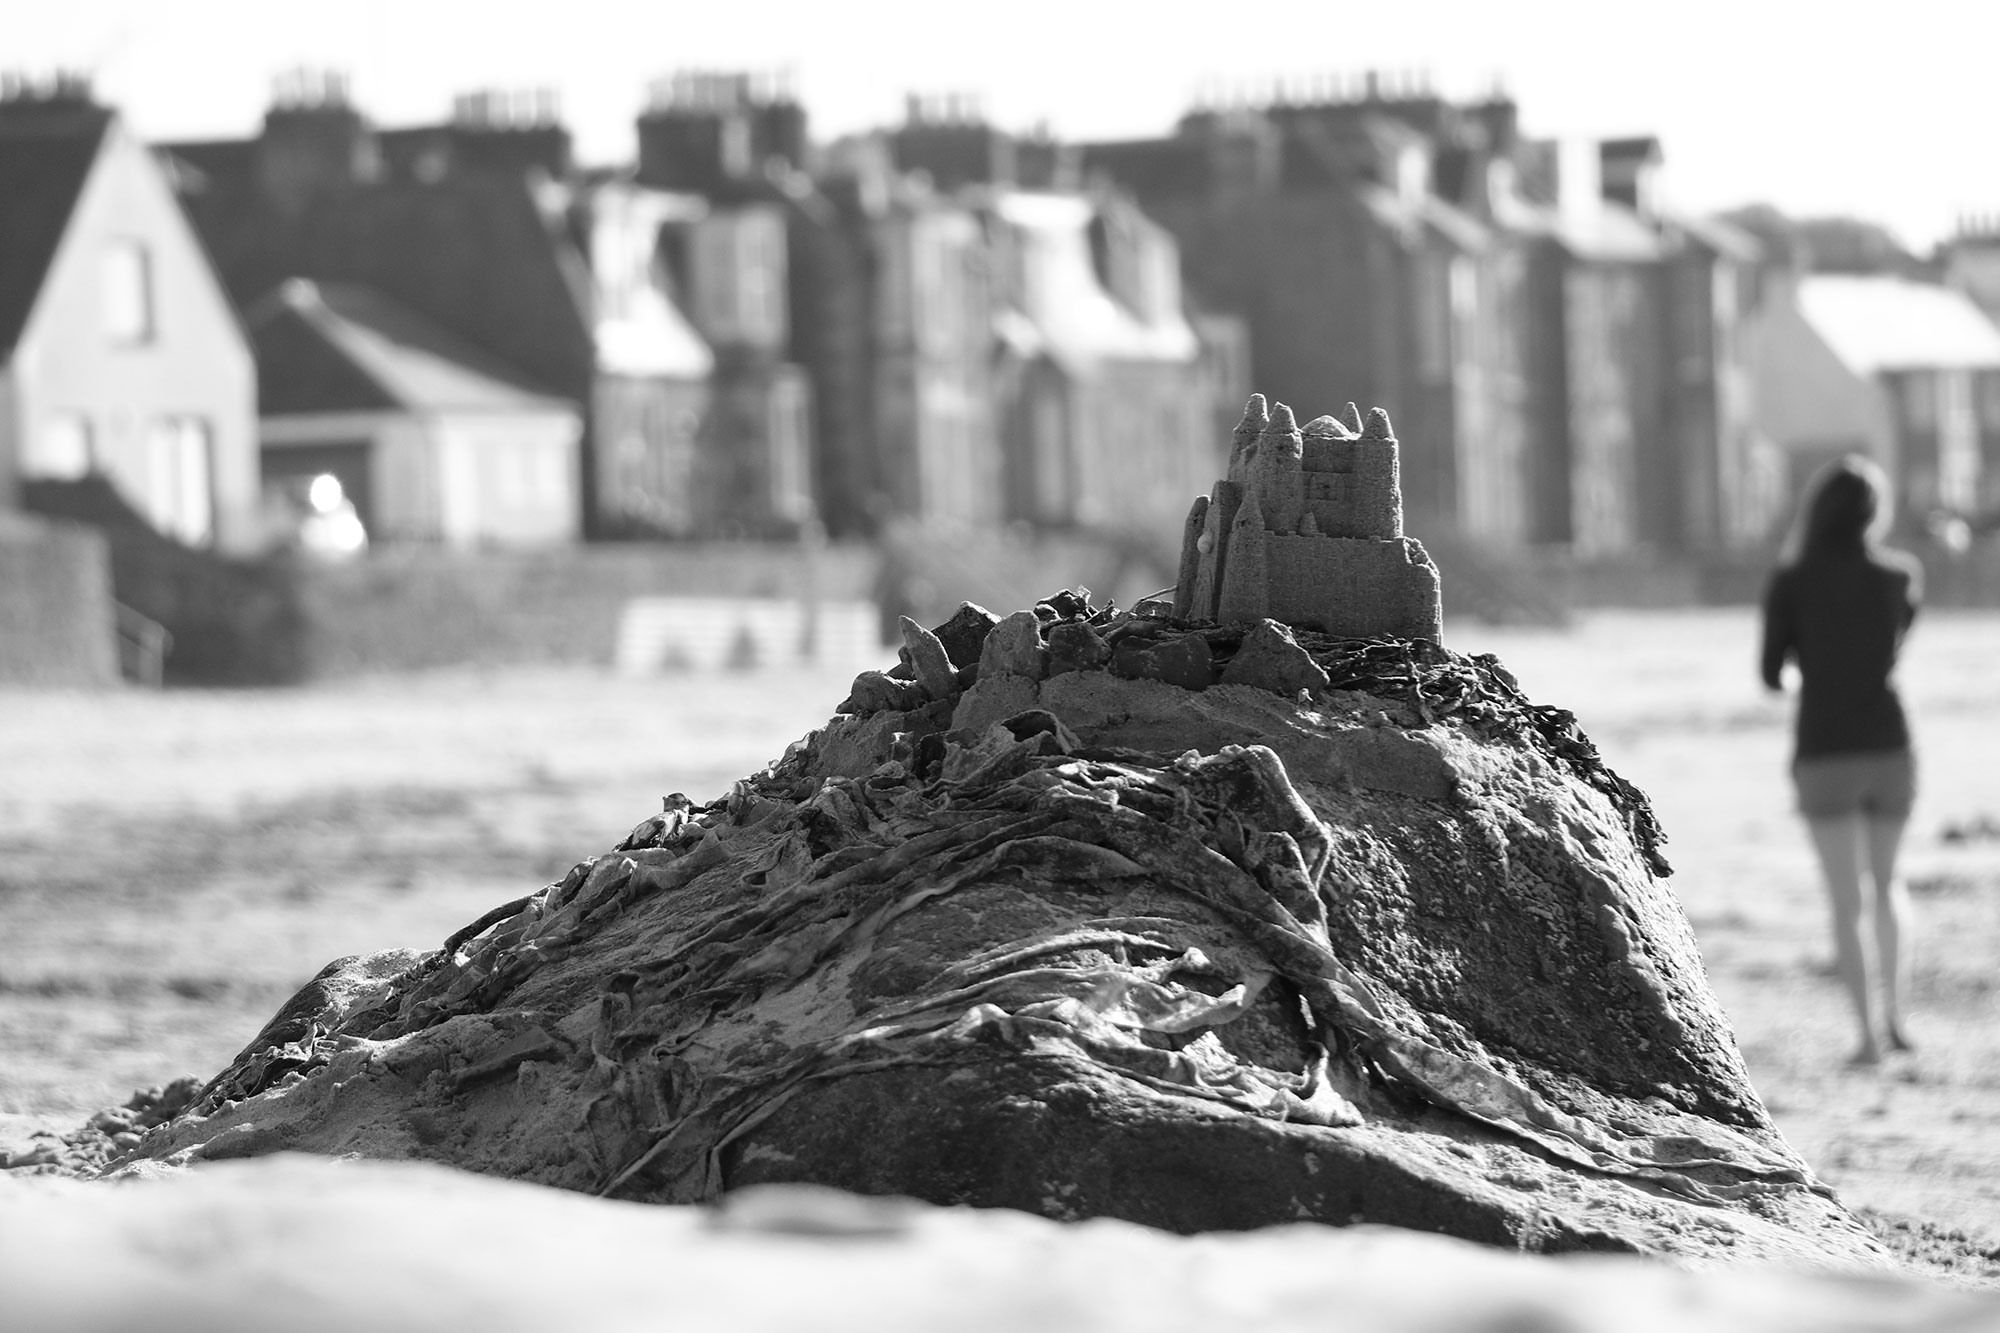
Above: Canon EOS 80D Monochrome Picture Style
The EOS 80D offers a number of optical corrections for lenses, under the lens aberration menu. Corrections are available for peripheral illumination, chromatic aberration and distortion with first two enabled by default.
During playback you can process RAW files in-camera, with the opportunity to adjust the brightness, white balance, Picture Style, Auto Lighting Optimiser, High ISO NR, Image quality, colour space, peripheral illumination correction, distortion correction, or chromatic aberration correction.
Unless otherwise stated, I used the default Auto Picture Style, which adjusts the processing according to the detected scene, in particular looking out for dominant colours. You can see a large selection of examples in my Canon 80D sample images gallery, or if you’d like to take a close look at how the quality compares to the Nikon D7200, check out my Canon 80D quality results. Or if you’ve seen enough, tab back to my verdict.
